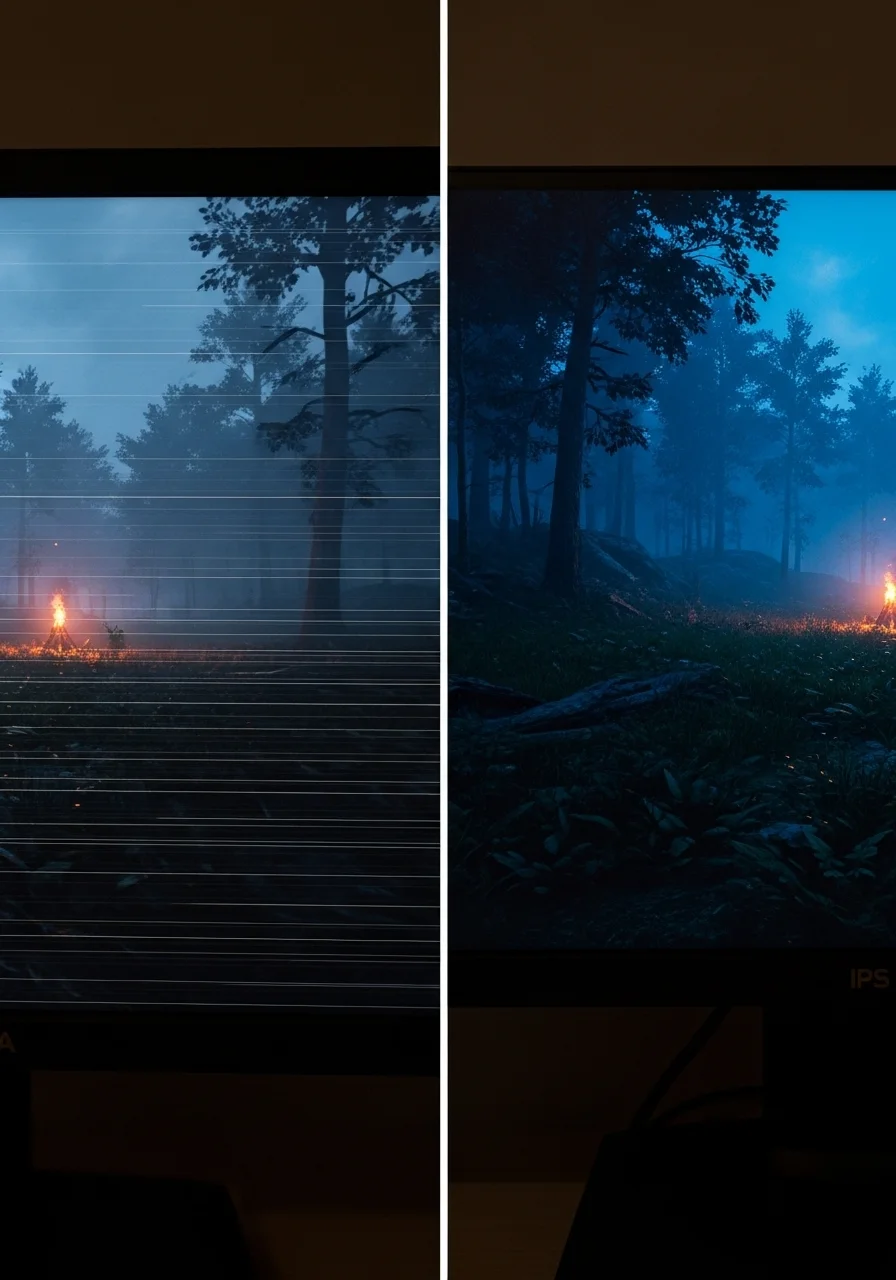
Dealing with annoying screen flicker while trying to clutch a round? It destroys your focus and ruins the immersion of your favorite titles.
We’ve got the ultimate playbook to fix G-Sync brightness flickering. Follow these steps to stabilize your display and reclaim your competitive edge.
Key Takeaways
- Identify if your VA or IPS panel type is contributing to the G-Sync flicker.
- Optimize Nvidia Control Panel global settings and cap FPS for stability.
- Use the Custom Resolution Utility (CRU) to adjust your VRR range.
- Upgrade to VESA-certified DisplayPort cables and update monitor firmware.
- Test your setup with Joltfly tools to ensure a flicker-free experience.
Understanding G-Sync Brightness Flickering: VA vs. IPS Panels
The G-Sync Flickering Challenge: VA vs. IPS Panels
You’re ready to dominate in your favorite competitive titles, but suddenly, your screen flickers. This G-Sync brightness flickering can throw off your game and break immersion.
Understanding your monitor’s panel type is key to tackling this issue head-on. Different display technologies react uniquely to G-Sync’s variable refresh rates.
VA Panels: High Contrast, Potential for Flicker
VA (Vertical Alignment) panels are prized for their exceptional contrast ratios and deep blacks. This makes games look incredibly cinematic and vibrant.
However, VA panels can be more prone to G-Sync brightness flickering. This often occurs when your framerate dips significantly, especially below your monitor’s Low Framerate Compensation (LFC) threshold.
The panel’s pixels might struggle to adjust their luminance smoothly with rapid frame rate changes. This leads to noticeable shifts in brightness, particularly in darker scenes.
IPS Panels: Wide Angles, Less Pronounced Flicker
IPS (In-Plane Switching) panels are champions of color accuracy and wide viewing angles. They are a popular choice for gamers seeking vibrant visuals and consistent image quality.
Generally, IPS panels tend to exhibit less severe G-Sync brightness flickering compared to VA counterparts. Their pixel response characteristics handle variable refresh rates more gracefully.
While not entirely immune, IPS flickering is often more subtle, sometimes appearing as minor brightness fluctuations rather than stark changes.
Why the Difference? Panel Technology at Play
The core difference lies in how each panel type manipulates liquid crystals to display images.
VA panels achieve their deep blacks by having liquid crystals that tilt to block more light. This process can be slower and less precise at very low refresh rates, contributing to flicker.
IPS panels, conversely, align their liquid crystals parallel to the screen. This allows for faster transitions and more consistent light output across varying refresh rates.
For more insights into monitor visual quality, check out our guide on IPS Glow vs. Backlight Bleed.
Impact on Your Gameplay
G-Sync brightness flickering, regardless of panel type, can be distracting. It pulls your focus from the action, impacting your reaction time and overall performance.
Imagine a sudden flicker during a clutch moment in an FPS game. This can be the difference between a headshot and a missed opportunity.
A pie chart showing dominant panel types in gaming monitors in 2022: IPS (70%), VA (21%), and TN (9%).
According to a 2022 report cited by Display Daily, IPS panels accounted for 70% of gaming monitor shipments, with VA at 21% and TN at 9%. This shows the prevalence of IPS panels in the gaming community.
Key Differences at a Glance
Here’s a quick breakdown of VA and IPS panels and their relation to G-Sync flicker.
| Feature | VA Panels | IPS Panels |
|---|---|---|
| Contrast | Excellent, deep blacks | Good, vibrant colors |
| G-Sync Flicker | More susceptible, especially at low FPS | Less susceptible, more subtle fluctuations |
| Response Time | Can be slower, ghosting possible | Generally faster, minimal ghosting |
| Viewing Angles | Decent, but color shift at extreme angles | Excellent, consistent from all angles |
To optimize your display’s visual performance, especially in dark scenarios, try our Display Black Level Test on Joltfly. It’s a game-changer for visibility.
Mastering your display settings means gaining a competitive edge. Don’t let flickering hold you back from peak performance.
In Short
- G-Sync brightness flickering can disrupt gameplay, with its severity depending on the monitor’s panel type.
- VA panels are more prone to G-Sync flicker, especially at low framerates, due to their liquid crystal technology.
- IPS panels generally exhibit less severe G-Sync flicker and are widely adopted in gaming monitors for their consistent performance.
Tier 1 Solutions: Optimizing Nvidia Control Panel and FPS Caps
First, access your Nvidia Control Panel. This is your command center for display optimization.
Right-click on your desktop and select “Nvidia Control Panel” to dive in.
Navigating these settings is key to eliminating G-Sync brightness flickering in your games.
In Short
- The Nvidia Control Panel is the central hub for display optimization.
- Accessing the Nvidia Control Panel helps eliminate G-Sync brightness flickering.
- You can access the Nvidia Control Panel by right-clicking on your desktop.
Configure Global Settings for G-Sync Stability
Start by adjusting the global settings. These apply to all your games, ensuring a consistent baseline.
Under “3D Settings,” select “Manage 3D settings.” Here is where you make critical adjustments.
- Monitor Technology: Set this to “G-SYNC” or “G-SYNC Compatible.” This ensures your display and GPU are communicating correctly.
- Low Latency Mode: Experiment with “On” or “Ultra.” This can significantly reduce input lag.
For more on minimizing input lag, explore our guide on NVIDIA Reflex vs AMD Anti-Lag.
- Power Management Mode: Choose “Prefer maximum performance.” This keeps your GPU from throttling during intense gaming sessions.
- Vertical Sync: Set this to “Off” in the Nvidia Control Panel. We will manage V-Sync differently.
Make sure G-Sync is enabled for “Full screen mode.” This is essential for dedicated gameplay.
Also, activate G-Sync for “Windowed and full screen mode” if you play in borderless windowed. This crucial setting covers all bases.
In Short
- Globally configure 3D settings in the Nvidia Control Panel for G-Sync stability.
- Key settings include enabling G-SYNC, Low Latency Mode (On/Ultra), Power Management (Prefer maximum performance), and Vertical Sync (Off).
- Activate G-Sync for both full screen and windowed modes to ensure comprehensive coverage.
Implement FPS Caps for Flicker-Free Gaming
Capping your frames per second is a game-changer for G-Sync flickering.
This technique prevents your GPU from exceeding your monitor’s refresh rate, maintaining G-Sync’s effectiveness.
When your FPS goes above the G-Sync range, G-Sync temporarily disengages, causing brightness fluctuations.
Why Cap FPS?
- Smooth Transitions: Keeps G-Sync active, providing a tear-free and flicker-free experience.
- Reduced Latency: Contrary to popular belief, capping frames can maintain lower input latency with G-Sync.
- Stable Brightness: Prevents the G-Sync module from rapidly switching on and off.
How to Cap Your Frames
Set your FPS cap 2-3 frames below your monitor’s maximum refresh rate. For a 144Hz monitor, cap it at 141-142 FPS.
You have a few ways to achieve this precision cap:
- In-Game Settings: Many modern games offer a built-in FPS limiter. This is often the best method.
- Nvidia Control Panel: Navigate to “Manage 3D settings” and find “Max Frame Rate.” Enable it and set your desired cap.
- Third-Party Tools: MSI Afterburner or RTSS (RivaTuner Statistics Server) offer advanced and highly accurate frame limiting.
Applying these Tier 1 solutions will drastically improve your G-Sync experience.
Get ready to dominate your gaming circle with stable, flicker-free visuals in every game.
Test your setup in your favorite games. See how these optimizations enhance your competitive edge on Joltfly.
In Short
- Capping your frames per second (FPS) prevents G-Sync flickering by keeping the GPU within the monitor’s refresh rate range.
- Benefits of FPS capping include smooth transitions, reduced input latency, and stable brightness.
- To cap FPS, set it 2-3 frames below your monitor’s maximum refresh rate using in-game settings, Nvidia Control Panel, or third-party tools.
Tier 2 Advanced Fix: The Custom Resolution Utility (CRU) Method
Ready for an advanced fix to tackle that annoying G-Sync brightness flickering? The Custom Resolution Utility, or CRU, is your next power play. This tool allows you to take direct control over your monitor’s EDID, letting you fine-tune display timings. It’s a game-changer for many who face persistent flickering.
CRU lets you tweak refresh rates and monitor parameters that Windows or NVIDIA drivers might not expose. By adjusting these settings, you can often eliminate the underlying timing inconsistencies that cause G-Sync flickering.
Why CRU Gets the Job Done
G-Sync flickering often stems from your monitor’s refresh rate range. Sometimes, the panel struggles to maintain consistent brightness at very low or high frame rates within the G-Sync window. CRU empowers you to redefine these boundaries.
You can effectively “trim” the G-Sync range by setting a slightly higher minimum refresh rate. This avoids the problematic low-framerate flickering zones. It’s a precise adjustment for a competitive edge.
A 2017 survey by TechSpot indicated that around 18% of users reported experiencing monitor flickering issues across various display technologies. This highlights the commonality of such display anomalies.
A bar chart showing reported monitor issues: Flickering (18%), Dead Pixels (15%), Backlight Bleed (12%), Input Lag (10%).
Implementing the CRU Method
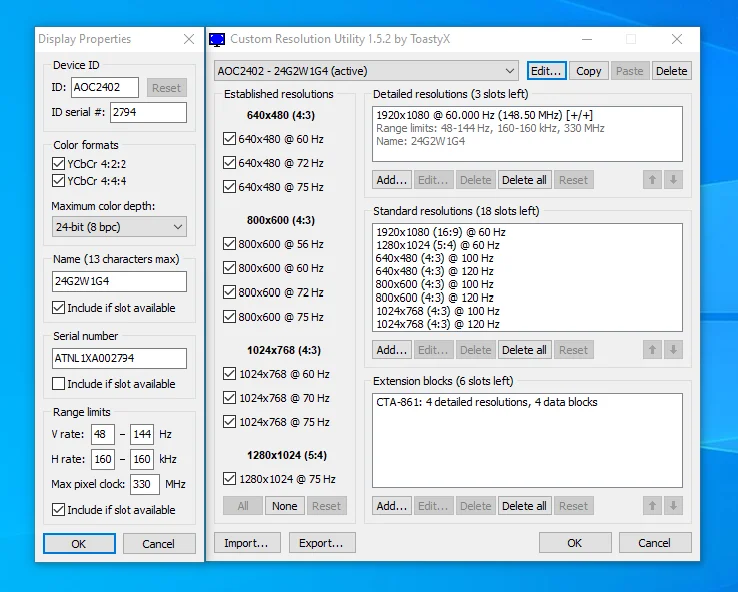
Before you begin, download the Custom Resolution Utility (CRU) from a trusted source like MonitorTests.com. Make sure you understand that incorrect settings can cause display issues. Proceed with caution.
Always create a backup of your current settings using the ‘export’ function within CRU. This allows you to revert any changes if something goes wrong.
Here’s your step-by-step guide to tackling G-Sync flicker with CRU:
- Run CRU as Administrator: Extract the CRU .zip file and run `CRU.exe` with administrative privileges.
- Select Your Monitor: Choose the correct monitor from the dropdown menu. If you have multiple displays, be sure to pick the one experiencing issues.
- Identify Active Resolutions: Under “Detailed resolutions,” locate your monitor’s native resolution and refresh rate. This is where you’ll make changes.
- Adjust G-Sync Range:
- Select your active resolution and click “Edit.”
- Focus on the “Refresh rate” setting.
- If your monitor’s G-Sync range officially goes down to 30Hz, try setting the minimum to 40Hz or 45Hz.
- This means you’ll modify the “Range limits” for FreeSync/G-Sync in the “Extension blocks” section, setting a higher minimum ‘Vertical frequency (Hz)’.
- A common fix is to increase the ‘Vertical blanking’ value slightly. Try increasing it by 1 to 5 lines. This can stabilize timings.
- Confirm and Restart: Click “OK” on all open CRU windows. Then, run `restart64.exe` (or `restart.exe` for 32-bit systems) from the CRU folder to restart your graphics driver. Your screen might flash briefly.
- Test Your Changes: Launch your game and check if the flickering persists. If it does, you may need to experiment with slightly different values.
- Revert if Necessary: If you encounter problems, run `reset-all.exe` from the CRU folder to revert to default settings, then restart your system.
This method requires patience and methodical testing. Each monitor is unique, and what works for one might need slight adjustments for another. Don’t be afraid to experiment within small increments.
Post-Fix Calibration and Testing
Once you’ve applied a CRU fix, it’s vital to test your display’s performance thoroughly. You’ve adjusted core timings, so verify everything is optimized.
Head over to Joltfly for essential tests. Use the Display Color Calibration Tool to ensure color accuracy remains top-tier. A flickering fix shouldn’t compromise your visual fidelity.
Also, consider running our Backlight Bleed Test, especially if your monitor was prone to it. Optimizing G-Sync should not introduce new visual artifacts. Stay sharp and dominate every match with a flicker-free display!
Step-by-Step: Adjusting VRR Range to Prevent LFC Triggering
You’re ready to tackle G-Sync brightness flickering head-on. This issue often stems from Low Framerate Compensation (LFC) activating.
LFC is a feature designed to keep G-Sync working even when your framerate drops below your monitor’s minimum Variable Refresh Rate (VRR) range.
However, when LFC activates, it can unfortunately cause noticeable brightness shifts or flickering.
The key is to prevent LFC from triggering. You need to keep your in-game FPS consistently within your monitor’s supported VRR window.
Follow these steps to fine-tune your setup and eliminate that annoying flicker, giving you the competitive edge you deserve.
Understand Your Monitor’s VRR Range
First, know your monitor’s G-Sync or FreeSync VRR range. This range, like 48Hz-144Hz, is crucial for adaptive sync.
It defines exactly when adaptive sync actively works to synchronize frames.
Check your monitor’s specifications or consult its user manual. This info is often listed under “Adaptive Sync” or “G-Sync Compatible” features.
Optimize In-Game Frame Rates
Your goal is to keep your game’s FPS above the lower limit of your monitor’s VRR range.
This critical step prevents LFC from kicking in and causing brightness flicker.
Adjust your in-game graphics settings. Lower demanding options like shadows, anti-aliasing, or texture quality if your framerate dips too low.
Maintaining stable FPS is vital for smooth gameplay and preventing stutter.
For deeper optimization, check our guide on how to fix shader compilation stutter.
Cap Your Framerate with RTSS
Even with optimized settings, FPS can fluctuate. Capping your framerate slightly below your monitor’s maximum refresh rate is a pro move.
Use RivaTuner Statistics Server (RTSS), often bundled with MSI Afterburner. Set your frame limit to 2-3 FPS below your max refresh rate.
For a 144Hz monitor, cap at 141 FPS. For a 240Hz monitor, cap at 237 FPS.
This provides a crucial buffer, ensuring G-Sync remains in its optimal operating range.
Advanced: Adjust VRR Range with Custom Resolution Utility (CRU)
This is for advanced users only. You can potentially modify your monitor’s VRR range using Custom Resolution Utility (CRU).
CRU allows you to edit display resolutions and refresh rates.
You might be able to extend the lower boundary of your VRR range, reducing LFC triggers.
However, proceed with caution. Incorrect settings can cause severe display issues.
Always research your specific monitor model before attempting this advanced modification.
Consult expert forums or your monitor manufacturer’s support for specific CRU recommendations.
Be aware: this advanced step is not universally applicable or recommended for all users.
Steps to Consider with CRU (Advanced)
If you’re confident, here’s a general approach with CRU:
- Download and open CRU.
- Select your monitor from the dropdown.
- Look for the “Extension blocks” section and the “FreeSync” or “G-Sync Compatible” data block.
- Adjust the minimum refresh rate value slightly lower, but be conservative.
- Restart your display driver (or your PC) for changes to take effect.
Remember, stability is key. If you encounter any issues, revert your changes immediately.
Always prioritize in-game optimization before resorting to advanced tools like CRU.
By carefully adjusting your VRR range and managing your in-game framerates, you will minimize G-Sync brightness flickering.
This optimization will lead to a clearer, more consistent visual experience. Dominate your gaming circle without distractions.
Test your newfound stability on Joltfly. Head over to our Aim Trainer.
See how a flicker-free display enhances your precision and helps you dominate!
In Short
- The Custom Resolution Utility (CRU) is an advanced tool that allows users to fine-tune monitor timings and refresh rates by controlling its EDID.
- CRU can resolve G-Sync flickering by enabling users to redefine the monitor’s refresh rate range, typically by setting a higher minimum refresh rate or adjusting vertical blanking.
- Implementing CRU requires caution, administrative privileges, backing up settings, and systematic testing to ensure display stability.
Tier 3 Hardware Checks: DisplayPort Cables and Monitor Firmware
Ready to crush that G-Sync brightness flickering? Sometimes, the fix isn’t in software tweaks. It’s time to dive into your hardware’s backbone: DisplayPort cables and monitor firmware.
These components are critical for delivering a flawless G-Sync experience. Ignoring them could leave you stuck with distracting visual glitches.
DisplayPort Cable Check: The Unsung Hero
Your DisplayPort cable is the lifeline for high-refresh-rate, G-Sync enabled gaming. A weak link here can cause flickering, signal drops, or inconsistent performance.
Don’t underestimate its impact on your display’s stability.
Inspect Your Connection
First, ensure your DisplayPort cable is fully seated. Give both ends, at your GPU and monitor, a firm push. A loose connection is a common culprit for weird display behavior.
Check for any visible damage to the cable itself. Kinks or fraying can disrupt signal integrity.
Upgrade to a Certified Cable
Many flickering issues vanish with a high-quality, VESA-certified DisplayPort cable. Cheap cables might claim high bandwidth but often fail under G-Sync’s demands.
Invest in a cable that meets the correct DisplayPort standard for your monitor. This ensures stable data transfer at peak performance.
| DisplayPort Version | Max Bandwidth (Gbps) | Common Resolution/Refresh Support |
|---|---|---|
| DisplayPort 1.2 | 17.28 | 4K @ 60Hz, 1440p @ 144Hz |
| DisplayPort 1.3 | 25.92 | 4K @ 120Hz, 8K @ 30Hz |
| DisplayPort 1.4 | 25.92 | 4K @ 120Hz (HDR), 8K @ 60Hz |
| DisplayPort 2.0 (UHBR 10) | 40 | 4K @ 144Hz, 8K @ 85Hz |
| DisplayPort 2.0 (UHBR 13.5) | 54 | 4K @ 240Hz, 8K @ 120Hz |
| DisplayPort 2.0 (UHBR 20) | 80 | 4K @ 240Hz (HDR), 16K @ 60Hz |
Source: VESA.org
Ensure your cable matches or exceeds the requirements of your monitor and GPU. This is crucial for optimal performance, especially with high refresh rates. Understanding display technology is key to winning, just like comparing DyAc vs G-Sync.
Monitor Firmware Update: Unlock Peak Performance
Monitor firmware is like the operating system for your display. It controls how your monitor interacts with your GPU and processes signals.
Outdated firmware can lead to compatibility issues, especially with G-Sync.
Why Firmware Matters
Manufacturers often release firmware updates to fix bugs, improve G-Sync compatibility, and enhance overall performance. A quick update can banish that annoying flickering.
It’s a direct route to optimizing your display’s capabilities.
How to Update Your Monitor Firmware
- Identify Your Monitor Model: Find the exact model number on the back of your monitor or in its OSD.
- Visit Manufacturer’s Website: Navigate to the support section of your monitor’s manufacturer (e.g., ASUS, LG, Acer, Samsung).
- Search for Firmware: Look for firmware updates specific to your model. Read the instructions carefully.
- Download and Install: Follow the manufacturer’s guide precisely. This often involves connecting a USB cable or using a USB drive.
Warning: Do NOT interrupt the power supply during a firmware update. This can brick your monitor, leaving it unusable. Always ensure stable power.
A successful update can drastically improve display stability and eliminate flickering. It can also enhance aspects like your display’s response time and overall visual clarity.
After checking your hardware, use Joltfly’s Display Stutter and Tearing Calculator to measure improvements. Challenge your gaming circle to see who can achieve the smoothest display performance!
In Short
- G-Sync flickering can often be resolved by addressing hardware components like DisplayPort cables and monitor firmware.
- Ensure your DisplayPort cable is VESA-certified, correctly seated, undamaged, and meets the bandwidth requirements of your monitor and GPU.
- Updating your monitor’s firmware is crucial for improving G-Sync compatibility, fixing bugs, and enhancing overall display performance.