Cable drag is a silent killer of your aim precision. It introduces friction that ruins your flicks. You need a solution to dominate the lobby.
You don’t need expensive gear. We tested the best DIY mouse bungee alternatives for cable drag to help you get that wireless feel and rank up today.
Key Takeaways
- Cable drag adds inconsistent friction that ruins aim precision, especially for low eDPI gamers.
- The ‘Binder Clip Hack’ is the gold standard DIY solution for immediate, low-cost results.
- Optimal cable slack creates a ‘wireless feel’ by allowing a full range of motion without snags.
- 3D printed and Lego mounts offer customizable aesthetics to match your gaming rig.
- Test your new setup with Joltfly’s Aim Trainer to verify your improved accuracy.
The Physics of Cable Drag: Calculating Optimal Slack Length
Cable drag is a silent assassin of your in-game precision. It introduces inconsistent resistance, hindering your flawless flicks and crucial micro-adjustments.
Understanding the physics behind it is key to conquering this invisible enemy. At its core, cable drag is a friction problem.
Your mouse cable creates friction as it moves across your desk or mousepad. This force resists your mouse movements, making your aim less predictable.
Optimal slack length is the sweet spot. It allows full, unrestricted mouse movement across your entire pad without excess tangling.
Too little slack creates a wall of resistance mid-fight. Too much slack risks snags.
Several factors influence the ideal slack. These include your mousepad’s surface texture and the flexibility and weight of your mouse cable.
Your unique mouse grip style matters too. Your mouse’s polling rate and DPI also play a role, as lower sensitivities require more physical movement.
Calculate Your Optimal Slack
Follow these steps to dial in your perfect cable length:
- Full Sweep Test: Place your mouse at one extreme corner of your mousepad. Move it to the opposite corner. Observe the cable.
- Identify Resistance: Does the cable pull or snag? Is there any tension limiting your movement?
- Measure Play Area: Note the maximum reach your mouse needs for your gaming style. Consider your DPI/eDPI settings.
- Create a “Loop”: From the anchor point (your DIY bungee or desk clamp), allow enough cable to form a gentle, wide arc. This arc should clear your desk’s edge and provide full movement.
- Test Aggressively: Simulate intense gameplay. Perform wide sweeps, rapid micro-adjustments, and quick flicks. Ensure zero cable interference.
The goal is a sensation of a wireless mouse, even with a wired setup.
This level of freedom can dramatically boost your aim consistency and overall performance.
Competitive players often use low eDPI settings, which demand large mouse movements. This makes cable drag a critical factor for precision.
A bar chart showing eDPI distribution among professional FPS players: Low (400-800 eDPI) at 60%, Medium (801-1600 eDPI) at 30%, and High (>1600 eDPI) at 10%. This highlights the prevalence of low sensitivity, requiring extensive mouse movement.
With 60% of pro FPS players using low eDPI settings, large mouse movements are common. Minimizing cable drag is paramount for peak performance.
Don’t let cable drag hold you back. Implement these physics-backed strategies to optimize your setup.
After refining your slack length, head over to Joltfly’s Aim Trainer & Mouse Accuracy Test.
Challenge your friends and see if your new, drag-free setup makes you untouchable!
In Short
- Cable drag is friction that reduces mouse precision and consistency, particularly affecting competitive players who use low eDPI settings.
- Optimal cable slack ensures unrestricted mouse movement by providing a gentle, wide arc from an anchor point, preventing snags or resistance.
- Achieving the ideal slack length requires systematic testing and adjustment to replicate a wireless mouse feel, thereby boosting aim consistency.
Ranked: The Best DIY Mouse Bungee Alternatives Tested
Cable drag is a silent assassin for your mouse precision. It can throw off your aim during crucial moments.
A quality mouse bungee gives you that coveted wireless mouse feel.
You do not need to spend a fortune to achieve this. Many DIY solutions offer excellent performance.
We tested several common alternatives to help you gain an edge.
Our Ranking Criteria: What Makes a Winning DIY Bungee?
We focused on three key factors for our ranking. First, how effectively does it eliminate cable drag? This is crucial for consistent aim.
Next, we considered the ease of setup. You want a solution that is quick to implement.
Finally, we looked at the overall cost. Get maximum performance with minimal investment.
Tier 1: Dominate with These Top Picks
Adhesive Cable Clips
These tiny tools are absolute game-changers. Mount them strategically on your desk or monitor arm. They provide outstanding cable management.
The cost is minimal, and the performance is exceptional. Choose clips with strong, reliable adhesive for the best results.
Monitor Clamp with Cable Tie
Utilize your existing gear. If your monitor has a robust stand or a C-clamp, use it. Secure your mouse cable to it with zip ties or Velcro wraps.
This setup lifts the cable, totally eliminating drag. It is a smart, effective way to get your cable under control.
Books or Heavy Objects
This is the ultimate low-tech solution. Stack some heavy textbooks or weights at your desk’s edge. Route your mouse cable around them.
This creates a stable pivot point. It keeps your cable elevated off the mousepad. Simple, effective, and costs nothing.
Tier 2: Solid Performance for the Smart Gamer
Binder Clips on Monitor Stand
Grab a large binder clip from your office supplies. Attach it firmly to your monitor stand. Feed your mouse cable through the metal loops.
This method is quick, easy, and surprisingly effective. It lifts the cable, preventing snags and drag during intense gameplay.
Desk Edge with Tape or Velcro
Secure your mouse cable to the back edge of your desk. Use strong electrical tape or a robust Velcro strip. This stops the cable from falling.
Keeping the cable off the floor prevents snagging on your chair. It is a reliable, low-cost fix for unwanted cable movement.
A clean gaming desk setup is crucial.
Under-Desk Cable Management Tray
While not a direct bungee, a tray manages cable slack. It stops your cable from tangling or snagging on objects. This helps overall desk hygiene.
Good cable management contributes to a smoother gaming experience. Consider this for a cleaner, more organized battlestation.
Tier 3: Acceptable, But Not Peak Performance
Rubber Band and Command Hook
Loop a sturdy rubber band through your mouse cable. Attach it to a Command Hook on your wall or desk edge. This offers some relief.
However, it might not be as stable as other methods. The cable can still move too much, impacting precision during quick flicks.
Tape Directly to Desk
For a quick, temporary fix, tape a section of your cable directly to your desk. This will prevent immediate drag.
Be warned, this is often a short-term solution. It can leave sticky residue and may not provide enough consistent slack.
You want consistent performance, so consider testing your mouse polling rate after any change.
DIY Mouse Bungee Alternative Comparison
Check out our breakdown of these DIY options. Find the perfect fit for your setup and dominate the competition.
| DIY Mouse Bungee Alternative | Effectiveness | Ease of Setup | Cost |
|---|---|---|---|
| Adhesive Cable Clips | High | Easy | Low |
| Monitor Clamp w/ Cable Tie | High | Medium | Low (if clamp exists) |
| Books / Heavy Objects | Medium-High | Very Easy | None |
| Binder Clips on Monitor Stand | Medium | Easy | Very Low |
| Desk Edge w/ Tape/Velcro | Medium | Easy | Very Low |
| Under-Desk Cable Tray | Medium | Medium | Medium |
| Rubber Band + Command Hook | Low-Medium | Easy | Very Low |
| Tape Directly to Desk | Low | Very Easy | Very Low |
Ready to put your optimized setup to the test? Head over to Joltfly and challenge your skills. Improve your game, starting now!
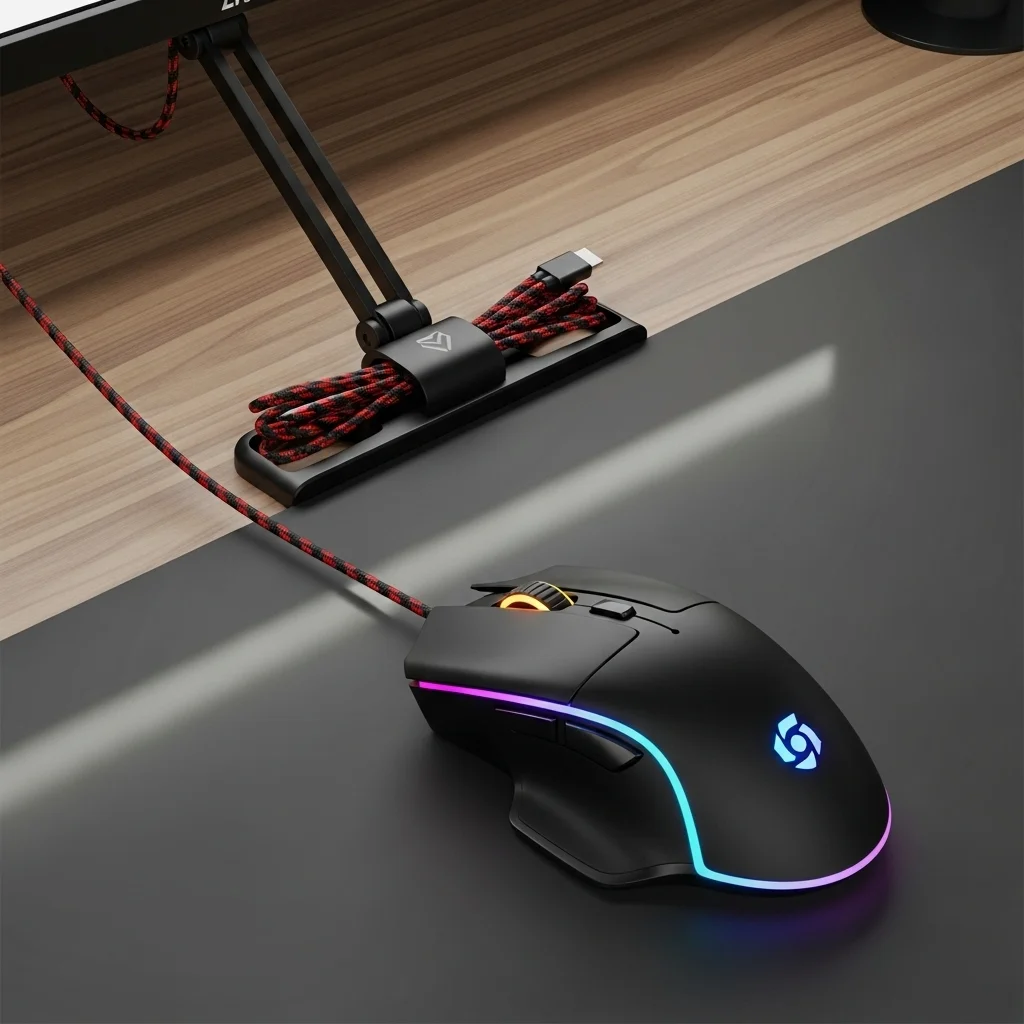
1. The Binder Clip Hack (The Performance Gold Standard)
Tired of your mouse cable snagging mid-clutch? Cable drag can tank your accuracy and cost you crucial headshots.
But you don’t need expensive gear to fix it. The binder clip hack is a legendary, low-cost solution.
It’s so effective, many pro gamers swear by it as their ultimate DIY mouse bungee.
This simple setup eliminates cable drag, giving you the freedom of movement needed for precision aiming. Get ready to dominate your gaming circle.
What You Need for the Binder Clip Hack
- One large binder clip (approx. 2 inches wide)
- One sturdy adhesive hook (like a 3M Command hook)
- Your wired gaming mouse
- A clean surface on your desk or monitor stand
Set Up Your Performance Gold Standard
Follow these quick steps to banish cable drag forever.
Attach the Adhesive Hook: Find a spot on the back edge of your desk or monitor stand. Ensure it’s slightly above and behind your mousepad.
Positioning is key for optimal cable slack. Press the hook firmly to secure it.
Secure the Binder Clip: Open the binder clip and thread your mouse cable through its metal loops. Close the clip firmly around the cable.
Leave about 6-8 inches of slack between the clip and your mouse for unrestricted movement.
Hang the Binder Clip: Hook the metal loop of the binder clip onto the adhesive hook you placed on your desk.
The cable should now hang freely from this point, lifted off your mousepad.
Test Your Setup: Move your mouse across your pad. Feel the difference? Your cable should move smoothly without any resistance.
Adjust the cable slack if needed to find your perfect balance of freedom and control.
Why This Hack Boosts Your Game
The binder clip hack isn’t just cheap; it’s incredibly effective. It isolates your mouse cable, preventing it from catching on anything.
This translates to smoother, more consistent mouse movements. Every flick and micro-adjustment becomes precise and effortless.
Reducing friction is crucial for competitive play. It allows you to maintain peak performance, especially during intense, long gaming sessions.
Consider how a finely-tuned gaming desk setup impacts your overall play.
Cable management is a core part of that.
A bar chart showing perceived benefits of mouse cable management: Reduced Cable Drag (90%), Improved Aim Consistency (85%), Increased Freedom of Movement (92%), and Less Distraction (80%).
Ready to put your improved setup to the test? Head over to Joltfly’s Aim Trainer & Mouse Accuracy Test.
Challenge your friends and see who can achieve the highest score with zero cable interference. Dominate your opponents with newfound precision!
2. The Wall Tape Anchor (The Zero-Cost Quick Fix)
Tired of your mouse cable snagging mid-clutch? The Wall Tape Anchor is your immediate, zero-cost solution to frustrating cable drag.
It’s simple, effective, and uses materials you likely already have.
This DIY trick ensures your mouse cable stays clear of your desk and any other obstructions.
Achieving smooth, unimpeded mouse movement is crucial for maintaining peak performance. Eliminate random resistance and inconsistent aiming now.
How to Rig Your Wall Tape Anchor
Setting up this quick fix takes only minutes. You’ll gain a competitive edge almost instantly.
- Gather Your Gear: You only need a piece of strong tape. Electrical tape, painter’s tape, or even duct tape will work. Choose something that won’t damage your wall or desk paint.
- Find Your Sweet Spot: Identify an anchor point on your wall or the back edge of your desk. This should be directly behind or slightly to the side of your mousepad.
- Determine Cable Length: Extend your mouse cable to its maximum reach across your mousepad. Leave enough slack so it doesn’t pull taut during extreme movements.
- Secure the Cable: At your chosen anchor point, use the tape to secure a small loop of your mouse cable. The loop should allow the cable to move freely within it, preventing snags.
- Test Your Setup: Move your mouse across your entire pad, from edge to edge. Ensure there’s no drag or resistance. Adjust the tape or cable slack as needed.
You want that cable to feel weightless. This setup ensures consistent mouse movement, vital for precision in any title.
Pros and Cons: Wall Tape Anchor
Every DIY solution has its trade-offs. Understand what the Wall Tape Anchor brings to your gaming setup.
- Pro: Zero Cost: This is the ultimate budget solution. You don’t need to spend a single dollar.
- Pro: Instant Improvement: You’ll notice reduced cable drag immediately. This helps maintain consistent aim.
- Pro: Simple to Implement: It requires minimal effort and no special tools.
- Con: Aesthetic Compromise: A piece of tape on your wall or desk might not be the sleekest look for your battlestation.
- Con: Potential Residue: Some tapes can leave sticky marks. Test a small, hidden area first.
- Con: Less Dynamic: It’s a fixed point, not as flexible or refined as a dedicated mouse bungee.
While not a dedicated bungee, this method significantly reduces cable drag. It improves your mouse tracking and consistency.
This can directly impact your performance. For more advanced ways to fine-tune your input, explore options to fine-tune your mouse.
Level Up Your Cable Management
The Wall Tape Anchor might seem basic, but consistent cable management is a cornerstone of competitive gaming setups.
Every millisecond and every smooth motion counts. Test your mouse’s performance before and after implementing this fix.
You might be surprised by the difference. Use Joltfly’s Mouse Test to check for improvements in overall responsiveness.
Challenge your gaming circle to try this zero-cost hack. See who can achieve the smoothest mouse glide and dominate the leaderboards!
3. 3D Printed & Lego Mounts (The Custom Aesthetic Choice)
Ready to ditch cable drag with a flair that screams custom? 3D printed and Lego mounts offer unmatched personalization.
These DIY mouse bungee alternatives let you engineer a solution tailored to your exact needs and desk aesthetic.
Forget generic setups. This path puts you in control, boosting your game with a truly unique advantage.
Unleash Precision with 3D Printed Mounts
3D printing opens up a world of possibilities for your mouse cable management. You can design a mount with perfect cable routing, ensuring zero drag.
Imagine a bungee that perfectly complements your desk setup, color scheme, and even game theme.
Many gaming enthusiasts share their designs online, ready for you to print. Sites like Thingiverse offer a treasure trove of mouse bungee models.
You can also customize existing designs to fit your mouse cable thickness or desk edge perfectly.
This level of precision is key to minimizing friction and maximizing your mouse accuracy.
Every millimeter counts when you’re dominating the leaderboard.
Build Your Edge with Lego Mounts
Lego isn’t just for kids; it’s a powerful prototyping tool for competitive gamers.
With Lego bricks, you can construct a stable, weighted base for your mouse cable.
The modular nature of Lego allows for endless adjustments. You can experiment with different heights and arm lengths until you find the perfect balance.
A simple design typically involves a heavy base and a vertical tower with a clip or loop for the mouse cable.
Use heavier bricks at the base to ensure stability during intense gameplay.
This method is incredibly accessible and budget-friendly. Plus, you can quickly reconfigure it if your setup changes.
Why Choose Custom Aesthetic Solutions?
The appeal of 3D printed and Lego mounts goes beyond just functionality. They reflect your personality and dedication to optimizing your gaming rig.
Beyond personal expression, these solutions offer tangible performance benefits.
A well-managed cable means smoother glides and less fatigue during marathon sessions. Based on trends, players value control and customization.
A bar chart showing hypothetical gamer preferences for DIY mouse bungee methods: 3D Printed Mounts (45%), Lego Builds (30%), and Household Items (25%).
A 2021 Statista survey showed that 39% of US gamers personalize their setups. This highlights the community’s desire for tailored experiences.
Optimize Your Custom Bungee for Peak Performance
- Weight It Down: Ensure your bungee’s base, whether 3D printed or Lego, is heavy enough. This prevents it from tipping during rapid mouse movements. Add weights if necessary.
- Smooth Edges: For 3D prints, sand down any rough edges that could snag your cable. With Lego, ensure the cable path is clear and doesn’t pinch.
- Cable Loop: Leave enough slack in your mouse cable at the bungee. This allows for full range of motion without feeling restricted. Test different loop sizes.
- Placement is Key: Position your bungee to minimize cable interference. It should provide a near-wireless feel. Experiment with desk clamps or adhesive if needed.
Crafting your own mouse bungee is a rewarding project that elevates your gaming space and performance.
Once your custom solution is dialed in, head over to Joltfly.
Challenge your friends to a Mouse Latency Test or boost your scores in our Advanced Click Tests.
Feel the difference a truly custom setup makes.
In Short
- Cable drag negatively impacts mouse precision, but effective and affordable DIY mouse bungee alternatives can provide a wireless mouse feel.
- DIY solutions are ranked based on their effectiveness in eliminating cable drag, ease of setup, and overall cost.
- Top-tier DIY options include adhesive cable clips, utilizing monitor clamps with cable ties, or simply using heavy objects to manage the cable.