Table of Contents
Your aim isn’t just about practice; it’s about physics.
If your flicks feel off despite perfect settings, your mouse sensor position is likely the culprit, changing how your wrist movements translate to on-screen headshots.
Whether you use a forward or rear alignment affects your pivot point and the “windshield wiper effect.”
We’ll break down exactly how to match your sensor to your grip style so you can optimize your mechanics and dominate the competition.
Key Takeaways
- Forward sensors exaggerate movement arcs, making them ideal for aggressive flicks and fingertip/claw grips.
- Rear sensors minimize rotational input, offering superior stability and tracking for palm grip users.
- The ‘windshield wiper effect’ dictates your crosshair path; aligning your sensor correctly harmonizes this arc with your aim.
- Use Joltfly’s Aim Trainer and DPI Calculator to mathematically compensate for sensor displacement and retrain muscle memory.
The Physics of Aim: Pivot Points and The Windshield Wiper Effect
Ready to unlock a deeper understanding of your aim?
The physics behind mouse movement are critical for competitive dominance.
It all boils down to pivot points and the notorious “windshield wiper effect.”
Your mouse doesn’t just slide.
Your hand, wrist, or arm acts as a pivot, creating an arc of movement.
The sensor’s position on your mouse directly influences how this pivot translates into on-screen action.
Understanding Pivot Points and Sensor Impact
Imagine your hand as the center of a compass.
When you rotate your wrist, the mouse moves along an arc.
The sensor reports these movements to your PC.
Where that sensor sits dramatically changes the input.
A sensor positioned towards the front of the mouse will exaggerate rotational movements.
Even a small wrist pivot can result in a larger, sweeping motion on screen.
This can be fantastic for wide flicks but tricky for fine adjustments.
Conversely, a sensor at the rear of the mouse will minimize rotational input.
Your small wrist movements translate into smaller, more controlled cursor shifts.
This offers precision for tracking but might feel sluggish for big turns.
Mastering this mechanical nuance is crucial for consistent performance.
The Windshield Wiper Effect: What It Is and How to Master It
The “windshield wiper effect” describes the natural arc your crosshair follows when you pivot your mouse, especially with wrist aim.
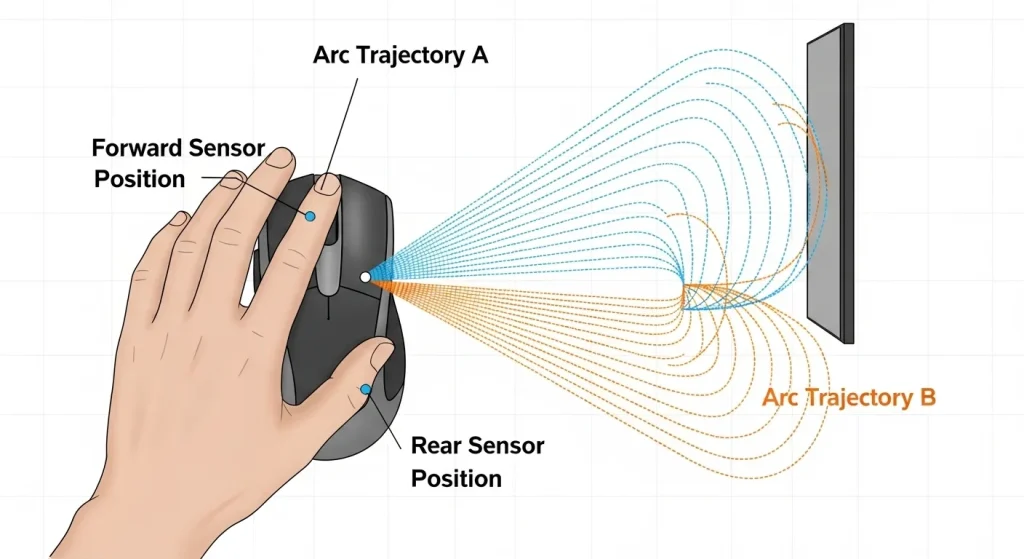
It’s like a car’s wiper blade sweeping across the glass.
This effect is always present.
Your goal is to understand it and use it to your advantage, not fight against it.
Different sensor positions alter the radius and perceived speed of this arc.
- Forward Sensor: Increases the arc’s radius for a given wrist pivot. Ideal for quick, large sweeps, but can make micro-adjustments feel twitchy.
- Rear Sensor: Decreases the arc’s radius. Offers more stability for precise tracking and small corrections, but might feel slower for rapid target acquisition.
The optimal sensor position often comes down to your personal FPS mouse grip.
Palm grippers often benefit from rear-aligned sensors due to their arm-dominant aiming style.
Claw and fingertip grippers, relying more on wrist and finger pivots, might prefer a more central or slightly forward sensor for quicker response.
Choosing your mouse’s sensor position is a critical step in optimizing your aiming mechanics.
It’s about finding harmony between your physical movements and the digital output.
A pie chart showing mouse grip preference among pro FPS players: Claw Grip (50%), Palm Grip (30%), Fingertip Grip (20%).
A survey by ProSettings.net among professional FPS players showed that a staggering 50% utilize a claw grip.
This highlights the importance of understanding how different grips interact with sensor placement.
Don’t just guess your optimal setup.
Head over to Joltfly’s Aim Trainer & Mouse Accuracy Test to experiment.
See how different mice, or even simulating different sensor positions, impacts your flick shots and tracking consistency.
Train smarter and dominate your gaming circle!
In Short
- Mouse aim is based on pivot points that create an arc of movement, which the mouse sensor translates into on-screen action.
- The sensor’s position on a mouse significantly impacts aim; a forward sensor exaggerates rotational movements for flicks, while a rear sensor minimizes them for precision.
- Understanding the ‘windshield wiper effect’ (the natural crosshair arc) and how sensor placement modifies it is crucial for optimizing aiming mechanics to suit your grip style.
Forward vs. Rear Alignment: Matching Sensor Position to Grip Style
Ready to unlock your true aim potential? The position of your mouse sensor is a subtle but powerful factor in your competitive performance.
It’s not just about DPI or polling rate.
Matching your sensor’s alignment to your unique grip style can give you a tangible edge.
Let’s dive into forward vs. rear alignment.
Forward Sensor Alignment: Precision for Finger Control
Mice with a forward sensor position place the sensor closer to the front edge of the mouse.
This setup is a game-changer for players who rely on fine, delicate finger movements for aiming.
Think about precise micro-adjustments in an intense FPS shootout.
If you use a claw or fingertip grip, a forward sensor often feels more natural.
Your fingertips become the primary movers, translating small twitches into direct cursor motion.
The sensor tracks these subtle finger movements with enhanced responsiveness.
This can lead to snappier target acquisition and superior tracking, especially for high-DPI players.
Rear Sensor Alignment: Stability for Wrist and Arm Movements
Conversely, a rear sensor position places the sensor closer to the back of the mouse, under your palm.
This design shines for gamers who prefer a palm grip, where the entire hand rests on the mouse.
Your wrist and arm drive most of your movements with a palm grip.
A rear sensor aligns more closely with this pivot point.
It can offer a more stable, predictable feel for wider sweeps and controlled tracking.
For games requiring broad, fluid mouse movements, a rear sensor can reduce perceived instability.
It ensures the sensor maintains a consistent distance from your primary movement axis.
Matching Sensor Position to Your Dominant Movement
The core principle is simple: where does your mouse movement originate?
If it’s primarily from your fingers, a forward sensor amplifies that sensitivity.
If your wrist or arm dictates movement, a rear sensor provides better alignment and control.
Experimentation is key to discovering what feels best for your unique style.
| Grip Style | Recommended Sensor Position | Why It Works |
|---|---|---|
| Fingertip Grip | Forward | Maximizes sensitivity to micro finger adjustments, quick reactions. |
| Claw Grip | Forward | Enhances response to combined finger and wrist movements, agile aiming. |
| Palm Grip | Rear | Provides stability for arm and wrist pivots, smooth, sweeping motions. |
Test and Dominate
Don’t just take our word for it. Your unique biomechanics dictate your optimal setup.
Grab a mouse with adjustable sensor positions if possible, or try different models.
Then, put your skills to the ultimate test.
Head over to Joltfly’s Aim Trainer.
Analyze your performance with different sensor alignments.
Track your accuracy, speed, and consistency. Challenge your friends to see who can optimize their setup for peak performance!
In Short
- Matching your mouse sensor’s alignment to your grip style is crucial for optimizing aiming performance.
- Forward sensor alignment is ideal for finger-dominant grips (fingertip, claw) for precise micro-adjustments, while rear alignment suits palm grips for stable wrist and arm movements.
- Experimentation is key to finding the optimal sensor position that best complements your unique grip and movement style.
The Data-Driven Fix: Compensating for Sensor Displacement
Unlock your peak performance by directly tackling sensor displacement.
Understanding your mouse’s sensor position is just the first step.
The true game-changer is how you compensate for its effects with data-driven adjustments.
Every gamer’s grip is unique.
Your preferred FPS mouse grip determines your wrist’s pivot point.
This pivot point directly impacts how a forward or rear sensor position feels.
For instance, a palm grip usually involves a more central pivot, potentially making rear sensor displacement less noticeable.
Fingertip grip, with its precise, small movements, might amplify the effects of any offset.
Optimize Your DPI & Sensitivity
Your mouse’s DPI and in-game sensitivity are your primary tools for correction.
Fine-tuning these settings can directly offset the rotational inaccuracies caused by sensor placement.
A minor adjustment can create a significant difference in your perceived aiming curve.
The goal is consistent, predictable movement, regardless of the physical sensor location.
A bar chart showing preferred DPI among CS:GO pro gamers: 400 DPI (38%), 800 DPI (38%), and Other DPIs (24%).
Many pro gamers stick to specific DPI ranges to ensure pinpoint accuracy. A 2021 survey of 1,600 CS:GO pros revealed that 76% used either 400 or 800 DPI.
Use Joltfly’s Mouse DPI/eDPI Calculator to find your perfect match. Experiment with slight changes and meticulously track your performance.
Refine with Polling Rate & Latency Tests
Beyond DPI, other factors like your mouse’s polling rate and overall latency play a role.
A higher polling rate means more frequent data updates, which can enhance perceived smoothness.
Even with optimal sensor positioning, high latency or an inconsistent polling rate can introduce unwanted jitter.
Test your setup thoroughly to eliminate these hidden performance killers.
With these hardware factors optimized, you can focus on the specific adjustments needed for your grip.
Actionable Steps for Precision
Ready to dominate? Take these steps to fine-tune your mouse and conquer sensor displacement:
- Identify Your Grip: Understand if you use palm, claw, or fingertip grip. This is your foundation.
- Test Baseline Performance: Before making changes, test your current aim with Joltfly’s tools. Get a benchmark.
- Adjust DPI in Increments: Make small, precise changes to your DPI. Re-test after each adjustment.
- Utilize In-Game Sensitivity: Pair DPI changes with your in-game sensitivity settings for the ultimate control.
- Verify Polling Rate: Ensure your mouse’s polling rate is stable and consistent. High rates like 1000Hz or 8000Hz can offer an edge.
- Practice Consistently: The “fix” is also in muscle memory. Practice with your refined settings in Joltfly’s Aim Trainer.
Don’t let sensor displacement hold you back.
Use Joltfly’s comprehensive device tests to scientifically optimize your mouse.
Challenge your friends to see who can achieve the most precise movements with their perfectly calibrated setup!
Measuring Your Mouse: The Sensor Position Database Methodology
Ever wonder why some mice just feel “right” and others don’t? It’s not just about DPI or polling rate.
The precise placement of your mouse sensor is a crucial, often overlooked factor.
For competitive gamers, understanding your mouse’s sensor position can give you a measurable edge.
Unveiling the Sensor Position Database
At Joltfly, we believe in data-driven performance. That’s why we’re building a comprehensive database.
This resource meticulously measures and records the sensor placement for a wide array of gaming mice.
We’re talking about precise measurements that influence everything from micro-adjustments to flick shots.
Our Methodology: Precision for Your Performance
Our approach involves detailed physical measurements and digital analysis.
We aim to quantify every aspect of the sensor’s location relative to the mouse body.
This allows you to compare and select mice based on concrete data, not just feel.
Here are the key metrics we capture for each mouse:
- Sensor X-Offset: Distance from the mouse’s center line to the sensor’s center.
- Sensor Y-Offset: Distance from the front edge to the sensor’s center. This is key for “forward vs. rear” alignment.
- Sensor Height from Surface (LOD): Lift-off distance, indicating how far you can lift before tracking stops.
- Total Mouse Length: Overall length for context.
- Total Mouse Width: Overall width for context.
How Sensor Placement Impacts Your Game
A forward sensor position means your mouse pivots around a point closer to your fingertips.
This can enhance fine aim control for wrist-aimers, making micro-adjustments feel more natural.
Conversely, a rear sensor position creates a longer pivot arm relative to the fingertips, but aligns closer to the wrist.
This might feel more stable for large arm movements, potentially favoring arm-dominant players.
It’s about matching the mouse’s physical characteristics to your unique grip and aiming style.
For instance, gamers with a higher polling rate mouse might notice even subtle differences more acutely.
These slight variations in sensor physics can translate to significant in-game results.
Don’t leave your performance to chance.
Optimize Your Setup with Joltfly Data
Understanding these details empowers you to make informed decisions about your gear.
Combine this knowledge with Joltfly’s other device tests to truly dial in your setup.
Test your reaction time, click speed, and overall mouse performance on Joltfly.
Challenge your friends to see who can find their perfect sensor alignment first and dominate the leaderboards!
Calculating the DPI Offset to Fix Muscle Memory
Changing your mouse’s sensor position can subtly shift your aiming feel.
This throws off your finely tuned muscle memory.
It’s frustrating when your precise flicks don’t land.
You need to compensate for this physical change. The key is to calculate a DPI offset, an adjustment that brings your effective sensitivity back in line.
Regain that familiar, pixel-perfect control.
Understanding the Sensor Shift
When you move the sensor forward or rearward, you create a lever arm effect.
Even if your mouse movement distance is identical, the cursor on screen travels differently.
A sensor positioned further from your pivot point (towards the front) acts like a longer lever.
This can make the same physical movement feel more sensitive on screen.
A sensor closer to your pivot (towards the rear) results in a shorter arc and feels less sensitive.
This subtle difference disrupts years of ingrained muscle memory. Your brain expects a certain output for a given input.
Calculating Your DPI Offset
To fix this, you need to adjust your mouse’s Dots Per Inch (DPI). The goal is to match your original effective sensitivity.
First, measure your mouse’s total length from front to back.
Then, identify the original and new sensor positions relative to the mouse’s center or a fixed point, like the front edge.
Here’s a simplified way to think about it:
New DPI = Original DPI × (Original Sensor Distance from Pivot / New Sensor Distance from Pivot)
Your “pivot” is typically the point where your wrist rests or the center of your rotation.
Consider a mouse where the sensor is moved from 60mm to 50mm from your primary pivot point. If your original DPI was 800:
- New DPI = 800 × (60 / 50)
- New DPI = 800 × 1.2
- New DPI = 960
You would then set your mouse to approximately 960 DPI to mimic your old feel. Fine-tuning will be essential.
This calculation provides a strong starting point. From there, use Joltfly’s Mouse DPI/eDPI Calculator to ensure your overall eDPI remains consistent.
The Importance of Consistent DPI
Professional gamers are incredibly particular about their mouse settings. Consistency in sensitivity is paramount for peak performance and muscle memory.
Any deviation can impact aim, flick shots, and tracking accuracy. This is why fixing a sensor position change with a DPI offset is crucial.
A study on professional player settings highlights this dedication to precision.
A bar chart showing common DPI settings among professional gamers: 400 DPI (45%), 800 DPI (40%), 1600 DPI (10%), and Other (5%). This illustrates the narrow range of preferred settings.
As you can see, approximately 85% of top competitive Valorant players utilize a DPI setting between 400 and 800, according to aggregated data from ProSettings.net.
This narrow band emphasizes the need for exact sensitivity.
Fine-Tune for Victory
The calculated DPI provides a solid baseline.
However, your personal feel is king.
Small adjustments are often necessary to perfectly recapture your muscle memory.
Jump into an Aim Trainer on Joltfly. Practice your flicks and tracking with the new settings. Observe how your crosshair moves.
Make micro-adjustments to your DPI until it feels just right. Challenge your gaming circle to beat your scores after you’ve perfected your setup!
In Short
- Compensating for mouse sensor displacement is crucial for peak performance, achieved through data-driven adjustments to DPI, sensitivity, and polling rate, tailored to individual grip.
- The precise physical placement of a mouse sensor significantly impacts aiming, and resources like Joltfly’s database help gamers understand and utilize this data for competitive advantage.