Table of Contents
Tired of lag ruining your killstreaks? It’s time to take control. Increasing your self-hosted server’s tick rate is the key to silky-smooth gameplay.
In this guide, we’ll show you exactly how to optimize your server settings and hardware. Get ready to banish lag and dominate your gaming circle!
Key Takeaways
- Align server tick rate with client FPS for lag-free performance and accurate hit registration.
- Optimize CPU priority and kernel settings to boost server processing speed.
- Use NIC offloading to free up valuable CPU resources for game logic.
- Configure sv_maxrate to prevent bandwidth bottlenecks and packet loss.
- Adjust tick rates based on specific game requirements like CS:GO or Minecraft.
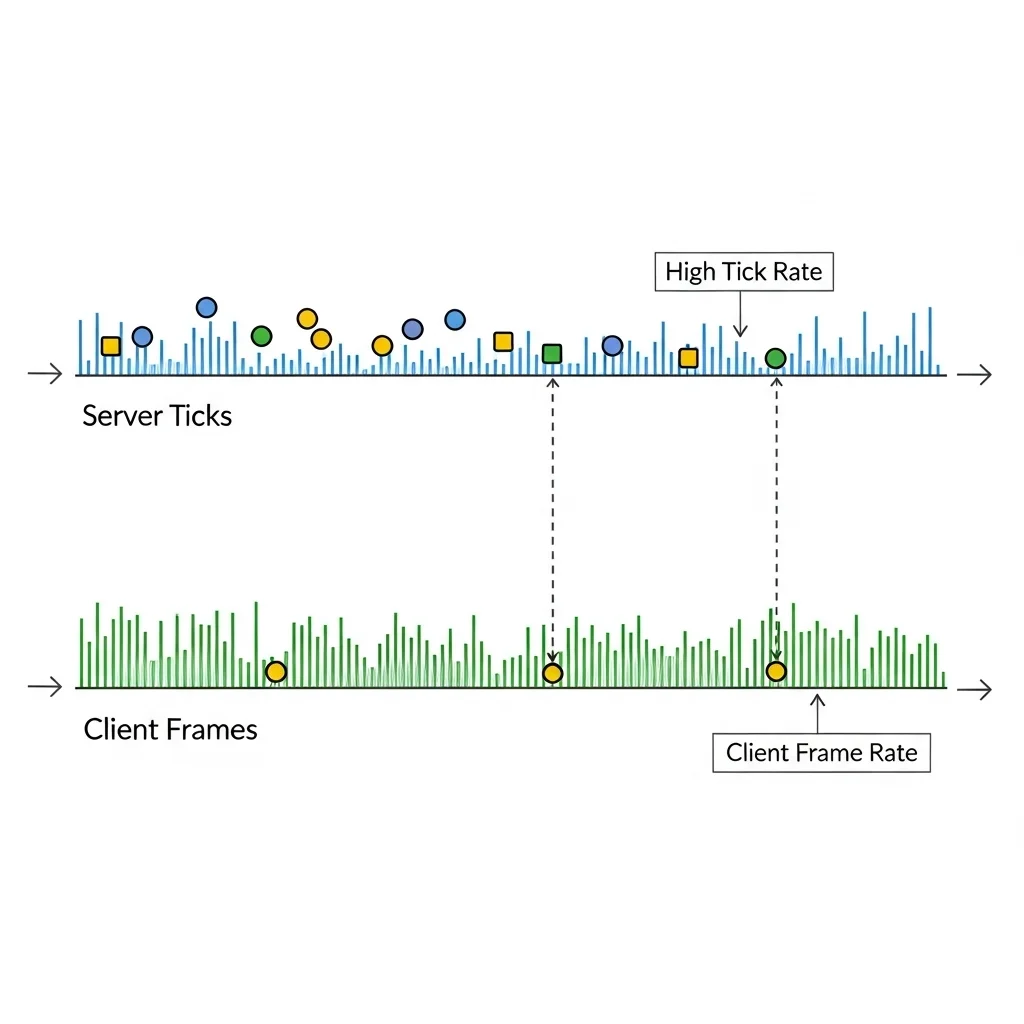
Server Tick Rate vs. Client FPS: Understanding the Bottlenecks
The Core Difference: Server Processing vs. Your View
Understand the critical distinction between server tick rate and your client’s Frames Per Second (FPS).
These two metrics fundamentally shape your gaming experience.
A higher tick rate server updates game logic more frequently. This ensures precise hit registration and smoother overall player movement for everyone.
Your client FPS, however, measures how many frames your personal computer renders each second. It directly impacts how fluidly you visually perceive the game.
What is Server Tick Rate?
Server tick rate dictates how often a server updates the game world state. Think of it as the server’s internal processing speed.
For instance, a 60-tick server updates the game state 60 times every second. A 128-tick server updates 128 times per second.
Higher tick rates mean the server broadcasts player inputs and events more often. This lowers perceived latency and makes gameplay incredibly responsive.
For your self-hosted server, increasing this rate delivers a competitive advantage. It translates to cleaner hit registration and less “peeker’s advantage.”
Understanding Client FPS (Frames Per Second)
Client FPS represents the rate at which your gaming rig generates and displays individual frames. It is a purely visual performance metric.
Achieving a higher FPS results in a smoother, more fluid visual experience. This advantage allows for faster target acquisition and improved reaction times.
If you own a 144Hz monitor, aim for 144 FPS or higher. This fully utilizes your monitor’s refresh rate capabilities.
Even with a fast server, low client FPS feels sluggish. Your commands send quickly, but visual feedback suffers.
Identifying Performance Bottlenecks
Your mission is to align server processing and client display. When out of sync, bottlenecks cripple your performance.
A common bottleneck is low server tick rate with high client FPS. The game looks smooth, but the server processes actions too slowly.
This leads to frustration. You might shoot an opponent on screen, but the server registers a miss due to delayed sync.
Conversely, a fast server with low client FPS causes issues. Your PC can’t visually keep pace, causing you to miss crucial info.
Optimize both for true domination. Do not let one hinder the other. We aim for uncompromised performance gains.
Network Latency and Its Impact
Network latency is another bottleneck. It represents the time data takes to travel between your client and the server.
High ping delays inputs and updates. Even with a 128-tick server, excessive latency nullifies the benefits.
Proactively optimize your network hardware and settings for competitive play.
Dive into our guide on how to fix bufferbloat and packet loss with QoS settings for actionable insights.
A bar chart illustrating gamer satisfaction levels based on network latency: Under 20ms (90% satisfied), 20-50ms (65% satisfied), 50-100ms (30% satisfied), Over 100ms (5% satisfied).
Studies show gamers hate latency. Over 90% report excellent gameplay with under 20ms latency.
Satisfaction drops to 5% when latency exceeds 100ms. Keep your ping low for the best experience.
Client-Side Input Lag
Even under ideal server and network conditions, your personal gaming setup can introduce measurable delays. This is known as client-side input lag.
Every component contributes to delays. This covers the time from your physical action to its visual representation.
In competitive gaming, every single millisecond is vital.
Optimize your entire input chain by reading our in-depth Response Time vs Input Lag: A Gamer’s Ultimate Guide.
Optimize for Peak Performance
To dominate, attack latency from every angle. This demands a holistic strategy, not just tweaking a single setting.
Follow these crucial steps to elevate your game:
- Maximize Server Tick Rate: Configure your self-hosted server to operate at the highest stable tick rate your specific game actively supports.
- Boost Client FPS: Consistently push your game’s frame rate to either match or significantly exceed your monitor’s maximum refresh rate.
- Eliminate Network Latency: Ruthlessly optimize your internet connection, fine-tune your router settings, and always prioritize wired Ethernet connections.
- Reduce Input Lag: Meticulously fine-tune your gaming peripherals and operating system settings to achieve the absolute minimum input delay.
Test your skills on Joltfly. Measure your reaction time and mouse latency to identify areas for improvement.
Challenge your friends and gaming rivals to see who can achieve the lowest overall latency.
Ultimate victory awaits those who commit to relentless optimization!
In Short
- Server tick rate dictates how frequently the game state is updated, influencing responsiveness and hit registration for all players.
- Client FPS determines how many frames your computer renders per second, directly impacting the visual fluidity of the game on your screen.
- Optimal gaming performance requires synchronizing a high server tick rate with high client FPS, while also minimizing network latency to avoid bottlenecks.
Hardware and OS Tuning: CPU Priority and Kernel Optimizations
Optimizing CPU Priority for Game Server Performance
Your self-hosted game server needs every ounce of power.
Ensuring your server process gets top CPU priority is crucial.
This helps it handle more player actions.
It also helps maintain a stable, high tick rate.
Without proper CPU priority, background tasks can hog resources. This causes lag, desync, and frustrating gameplay for everyone.
You want your server to respond instantly.
You can adjust CPU priority on both Windows and Linux server operating systems.
Windows Server CPU Priority
On Windows, use Task Manager to set your game server’s priority.
- Open Task Manager (Ctrl+Shift+Esc).
- Go to the “Details” tab.
- Find your game server’s executable (.exe).
- Right-click, select “Set priority,” then choose “High” or “Realtime.”
Choosing “Realtime” is powerful but can make your OS unstable if the server demands too much. Start with “High” and test its impact on your gameplay.
Carefully observe your system’s stability.
Linux Server CPU Priority (Nice & Renice)
Linux offers precise control with `nice` and `renice` commands.
A lower `nice` value means higher priority. The default is 0. You can go down to -20 for maximum priority.
To start a server with high priority, use:
nice -n -10 ./your_game_server_executable
To change priority for an already running process, find its Process ID (PID) first.
ps aux | grep your_game_server_name
renice -n -10 -p YOUR_SERVER_PID
Test these settings to prevent system instability. A stable server environment is key to dominating your online battles.
CPU health impacts performance. Learn to fix CPU power limit throttling to ensure peak efficiency.
Kernel Optimizations for Peak Server Tick Rate
Beyond CPU priority, tuning your operating system’s kernel can unlock significant performance gains for your game server.
These optimizations reduce latency and increase throughput, directly contributing to a smoother, higher tick rate experience.
Network Buffer Tuning
Game servers rely heavily on network communication. Default kernel network buffer sizes might be too small for intense gaming traffic.
This can lead to bottlenecks.
Increasing these buffers can prevent packet loss and ensure data flows smoothly. This is critical for maintaining a consistent tick rate.
- Windows: Adjust TCP receive window auto-tuning level via `netsh interface tcp set global autotuninglevel=normal`.
- Linux: Modify `net.core.rmem_max` and `net.core.wmem_max` in `/etc/sysctl.conf`.
For example, set `net.core.rmem_max = 16777216` and `net.core.wmem_max = 16777216` for larger buffers. Reload with `sysctl -p`.
Always back up your configuration files before making changes. Monitor server performance closely after adjustments.
Interrupt Coalescing & IRQ Affinity
Interrupts signal the CPU to handle I/O events, like network packets. Too many interrupts can burden your CPU.
Interrupt coalescing groups multiple interrupts into one, reducing CPU overhead. Modern network cards often handle this.
IRQ affinity binds network card interrupts to specific CPU cores. This prevents contention and improves processing efficiency.
On Linux, you can manage IRQ affinity via files in `/proc/irq/IRQ_NUMBER/smp_affinity`. Assign different network card IRQs to different cores.
This prevents CPU core overload.
Use the `cat /proc/interrupts` command to see current IRQ assignments and identify high-frequency interrupts.
Careful tuning here can significantly reduce latency and provide a competitive edge for your server.
Disable Unnecessary Services
Every running service consumes CPU cycles and RAM. On a dedicated game server, disable any service not essential for the OS or game.
This is a quick win for performance.
This frees up valuable resources, allowing your game server to utilize more CPU power. This directly boosts your tick rate.
Review your installed services on both Windows and Linux. Only disable services if you are certain they are not needed.
Ready to test? While we can’t test server tick rate directly, you can sharpen your own reflexes on Joltfly.
Boost your personal input speed.
Head over to the Reaction Time Test to check your personal latency. Then challenge your friends to see who has the fastest response!
Network Interface Card (NIC) Offloading and Interrupts
Unleash Server Power with NIC Offloading
Ready to push your self-hosted game server’s tick rate to its absolute limit? You need to master Network Interface Card (NIC) offloading.
This critical technique shifts taxing network processing from your CPU directly to your NIC.
The result is a powerhouse server with more CPU cycles dedicated to game logic. This translates to a significantly higher tick rate and smoother gameplay.
How NIC Offloading Works to Dominate Lag
NIC offloading features are designed to handle routine network tasks that would otherwise bog down your server’s CPU.
By delegating these functions, your CPU can focus on what truly matters: delivering a low-latency, high-tick-rate gaming experience.
These optimizations are key to gaining a competitive edge in your gaming circle.
Checksum Offloading: Lighten the CPU Load
Every network packet requires a checksum calculation to ensure data integrity. This seems minor, but it adds up.
Checksum offloading hands this task directly to the NIC.
This frees up valuable CPU cycles, giving your server more processing power for critical game operations.
Large Send Offload (LSO): Streamline Data Transfer
LSO allows your server to send large chunks of data at once, rather than breaking them into smaller packets before the NIC.
The NIC then handles the segmentation.
This reduces CPU overhead for sending data, a huge win for high-bandwidth game servers.
Receive Side Scaling (RSS): Distribute Network Traffic
RSS is a game-changer for multi-core server CPUs. It distributes incoming network processing across multiple CPU cores.
Instead of one core getting swamped, the load is balanced.
This prevents bottlenecks and ensures your server can efficiently process all inbound game data, maintaining a high tick rate.
A bar chart showing typical CPU utilization for network processing: 35% without offloading, and 10% with offloading.
Studies, like those from Intel, show NIC offloading can reduce network CPU utilization by 50-70%.
This massive reduction directly translates to more available CPU power for your game server’s tick rate.
Managing Interrupts for Peak Server Performance
Network interrupts notify your CPU that data has arrived or been sent. Managing these interrupts correctly is crucial.
Poor interrupt handling can introduce latency and degrade your server’s tick rate.
Optimize these settings to ensure your server responds instantly to game events.
Interrupt Moderation: Find the Balance
Interrupt moderation batches interrupts together, reducing the number of times the CPU is interrupted.
Too much moderation can increase latency, as data waits to be processed.
Too little can flood the CPU with frequent interruptions, increasing overhead. Find your server’s sweet spot for responsiveness.
Interrupt Affinity: Dedicate Core Power
Interrupt affinity allows you to bind specific NIC interrupts to particular CPU cores.
By dedicating cores to network processing, you can prevent these interrupts from interfering with cores running your game server application.
This fine-tuning ensures maximum CPU efficiency and a stable, high tick rate.
Here’s a quick guide to common NIC offloading and interrupt settings:
| Setting | Description | Impact on Tick Rate |
|---|---|---|
| Checksum Offload | NIC handles packet checksum calculations. | Reduces CPU load, freeing cycles for game logic. |
| Large Send Offload (LSO) | NIC segments large data blocks. | Lowers CPU overhead for sending large game updates. |
| Receive Side Scaling (RSS) | Distributes network processing across multiple CPU cores. | Prevents single-core bottlenecks, improves throughput. |
| Interrupt Moderation | Batches network interrupts for CPU processing. | Balanced setting reduces latency and CPU interruptions. |
| Interrupt Affinity | Assigns NIC interrupts to specific CPU cores. | Ensures dedicated CPU resources for network tasks, prevents contention. |
Optimizing NIC settings is powerful. Pair these tweaks with software optimizations like managing Bufferbloat for best results.
Don’t just set it and forget it. Experiment with these configurations on your Joltfly self-hosted server.
Test your server’s tick rate and challenge your friends to experience the difference. Dominate your gaming scene with a perfectly tuned network!
In Short
- Optimizing CPU priority for game server processes is crucial for stable performance and high tick rates on both Windows and Linux.
- Kernel optimizations, including network buffer tuning, interrupt coalescing, and IRQ affinity, significantly reduce latency and improve server throughput.
- Disabling unnecessary services on a dedicated game server frees up CPU and RAM, directly boosting its performance and tick rate.
Essential Bandwidth Commands: sv_maxrate and Configuration
Master Your Server’s Bandwidth with sv_maxrate
Ready to dominate your private game server? The sv_maxrate command is your secret weapon for managing network traffic.
This critical setting dictates the maximum data rate, in kilobytes per second (KB/s), that your server can send to each connected client.
A higher value means more game data can flow, directly impacting your tick rate’s effectiveness and reducing dreaded lag.
By optimizing sv_maxrate, you ensure your players experience buttery-smooth gameplay and ultra-responsive actions.
Understanding Server Bandwidth and Tick Rate Synergy
Bandwidth and tick rate synergy is crucial. High tick rates send more updates, but insufficient bandwidth chokes them.
This leads to packet loss and a frustrating, choppy experience for your gaming circle. It’s like having a race car with a tiny fuel line.
While client-side commands like cl_updaterate and cl_cmdrate handle player input, sv_maxrate ensures the server can deliver its end of the bargain.
You need to find the sweet spot. Too low, and you introduce lag. Too high, and you might saturate your network, affecting other services.

Recommended sv_maxrate Configuration for Competitive Play
Setting the right sv_maxrate depends on your server’s upload capacity and the specific game. Here’s a general guide to get you started:
| Game Type / Player Count | Recommended sv_maxrate (KB/s) | Notes |
|---|---|---|
| Small FPS (e.g., CS:GO, 5v5) | 20000 – 60000 | A higher value is ideal for 128-tick servers. |
| Larger FPS / Battle Royale | 60000 – 100000+ | Demands more bandwidth due to player count and map size. |
| Strategy / Sandbox (Lower Tick) | 5000 – 20000 | Less intensive, but still benefits from stability. |
| Minecraft (PvP) | 10000 – 40000 | Crucial for hit registration and block updates. |
Remember, these are starting points. Always test your settings on Joltfly’s various device tests or your own server to fine-tune them.
Step-by-Step Configuration Guide
Adjusting sv_maxrate is straightforward on most self-hosted game servers. You’ll typically access the server console or configuration files.
First, connect to your server’s console via RCON or SSH. For many Source engine games, you can use the in-game console with developer commands enabled.
Enter the command: sv_maxrate "YOUR_VALUE". Replace “YOUR_VALUE” with your desired kilobytes per second, like sv_maxrate "60000".
For persistent changes, add this command to your server’s main configuration file, often named server.cfg or similar.
A simple restart of the game server usually applies these new settings. Monitor your network performance for choke and loss to confirm effectiveness.
A bar chart showing packet loss percentages: 15% at 2 Mbps, 5% at 5 Mbps, and 1% at 10+ Mbps bandwidth caps, based on simulated game traffic.
Optimize Your Network for Flawless Gaming
A robust network is key. Ensure your server hardware is capable and your connection has ample upload bandwidth.
Even the best server settings can’t overcome a weak connection. Consider upgrading your Ethernet cables to Cat 8 for superior gaming latency.
Client-side optimizations also play a huge role. Make sure your own gaming rig and connection are tuned for minimal latency and maximum data throughput.
Ready to put your server and network to the test? Challenge your friends to a game on your optimized server and see who truly dominates the leaderboard!
In Short
- The sv_maxrate command is crucial for managing server network traffic by setting the maximum data rate sent to clients, which directly impacts tick rate effectiveness and reduces lag.
- Optimizing sv_maxrate ensures smooth gameplay by preventing packet loss, and its ideal value depends on game type and player count, with specific configuration steps provided.
- Beyond sv_maxrate, a robust network infrastructure, including capable server hardware and ample upload bandwidth, is essential for flawless gaming performance.
Cheat Sheet: Tick Rate Settings for Top Self-Hosted Games
Master Your Server Tick Rate for Unbeatable Performance
Ready to dominate your gaming circle? Understanding and optimizing your self-hosted game server’s tick rate is crucial.
It directly impacts how smoothly your game runs, how accurate your hits are, and your overall competitive edge.
Why Tick Rate Matters to Your K/D Ratio
Tick rate represents how many times per second your game server updates the game world.
A higher tick rate means more frequent updates, leading to a more responsive and precise gameplay experience.
Imagine every shot landing perfectly, every movement registering instantly. That is the power of a high tick rate.
Recommended Tick Rate Settings for Popular Titles
Different games thrive on specific tick rates. Here is a cheat sheet to get you started on popular self-hosted games.
Remember, optimal settings balance raw performance with your server’s hardware capabilities and player load.
| Game Title | Recommended Tick Rate (Hz) | Notes for Self-Hosting |
|---|---|---|
| Minecraft (PvP) | 20-60 (higher for competitive PvP) | Can be set in server.properties. Balance with server CPU and plugin load. |
| CS:GO / CS2 | 64 (default), 128 (competitive) | Set with `tickrate` command. Requires robust CPU and network. |
| Rust | 10-30 | Adjust `server.tickrate` in server config. Heavily impacted by player count and base complexity. |
| ARK: Survival Evolved | 30-50 | Often configured via launch parameters or server settings. Intense on CPU and RAM. |
| Valheim | 20-30 | Default is 20 Hz. Can be adjusted, but performance gains might be limited by game engine. |
Tuning Your Minecraft PvP Server
For Minecraft PvP, a 20 Hz tick rate is standard, but pushing to 60 Hz can offer a significant advantage.
Ensure your server CPU and RAM can handle the increased load, especially with many players or complex Redstone builds.
Optimizing CS:GO/CS2 for Competitive Play
Competitive CS:GO and CS2 servers often run at 128 tick. This provides incredibly precise hit registration and fluid motion.
It demands powerful server hardware and a consistently stable, high-bandwidth network connection.
Factors Influencing Your Server’s Tick Rate
Achieving a consistently high tick rate is not just about changing a number in your config. Several factors impact your server’s ability to maintain it.
- Server Hardware: A powerful CPU with high single-core performance and ample, fast RAM are critical. Under-spec hardware will bottleneck performance.
- Network Bandwidth: Your internet connection’s upload speed is vital for sending frequent game state updates to all connected clients.
- Network Latency: Low ping between the server and players minimizes perceived lag and ensures timely data exchange.
- Player Count: More players mean a larger volume of data to process and send, significantly increasing the server’s workload.
- Game Complexity: Games with detailed physics, numerous entities, or large, dynamic maps naturally demand more from your server’s resources.
Upgrade hardware for peak performance. Faster storage, discussed in our RAM Disk vs. SSD test, improves responsiveness.
Ensure your connection is top-tier. Explore Cat 6 vs Cat 8 Ethernet cables to minimize latency and packet loss.
Achieve Your Lowest Latency with Joltfly
Optimizing your server’s tick rate is a massive step towards a smoother, more competitive gaming experience for everyone.
But the journey to peak performance does not stop there. Your personal reaction time and mouse precision are just as crucial.
Head over to Joltfly and test your skills. Challenge your friends to the Aim Trainer & Mouse Accuracy Test and see who truly dominates the game.
In Short
- Tick rate is essential for smooth gameplay, accurate hits, and competitive advantage, as it dictates how often the game server updates the game world.
- Different games have recommended tick rates (e.g., CS:GO 128 Hz for competitive play), and optimizing this setting balances performance with server hardware capabilities and player load.
- Maintaining a high tick rate requires powerful server hardware, ample network bandwidth, low latency, and is significantly influenced by player count and game complexity.
Unleash Maximum Performance
Stop settling for laggy gameplay! Boosting your server’s tick rate is the secret weapon for silky smooth action and perfect hit registration.
You have the tools to upgrade your self-hosted setup. Don’t let default settings hold back your potential. Take control now.
Get in there, tweak those config files, and watch your friends marvel at your lag-free arena. Go dominate the competition!
Frequently Asked Questions
What exactly is a server tick rate?
It is the frequency at which a server updates the game state per second. Higher rates mean smoother movement and more accurate shooting.
Does increasing tick rate use more CPU?
Absolutely. A higher rate forces your server to calculate data more often. Ensure your hardware is powerful enough to handle the load.
What is the best tick rate for FPS games?
Aim for 64 or 128 ticks for competitive shooters. This provides the responsiveness needed for high-level play and snappy aim.
Can I change the tick rate on every game?
Not always. Some game engines hardcode the update rate. Check your specific game’s documentation before diving into the config files.