Table of Contents
Is your rig losing FPS during clutch moments? Your motherboard VRMs might be overheating, causing hidden lag that destroys your competitive edge.
Don’t let thermal throttling hold you back. Master safe temperature ranges, fix cooling bottlenecks, and optimize your setup to dominate every match.
Key Takeaways
- Ideal VRM temperatures for gaming range from 50°C to 80°C; consistently exceeding 90°C risks severe thermal throttling.
- Verify extreme 100°C+ readings with HWiNFO64 to rule out common ‘ghost sensor’ glitches before panicking.
- AIO liquid coolers often require extra case airflow strategies, as they lack the direct breeze that air coolers provide to VRMs.
- Budget motherboards may struggle with high-end CPUs; upgrading VRM cooling is essential for sustained competitive performance.
- Regular monitoring prevents stability issues, ensuring your hardware delivers the frame rates you need to win.
Safe VRM Temperature Ranges: Daily Use vs. Throttling Limits
Understanding VRM Temperatures
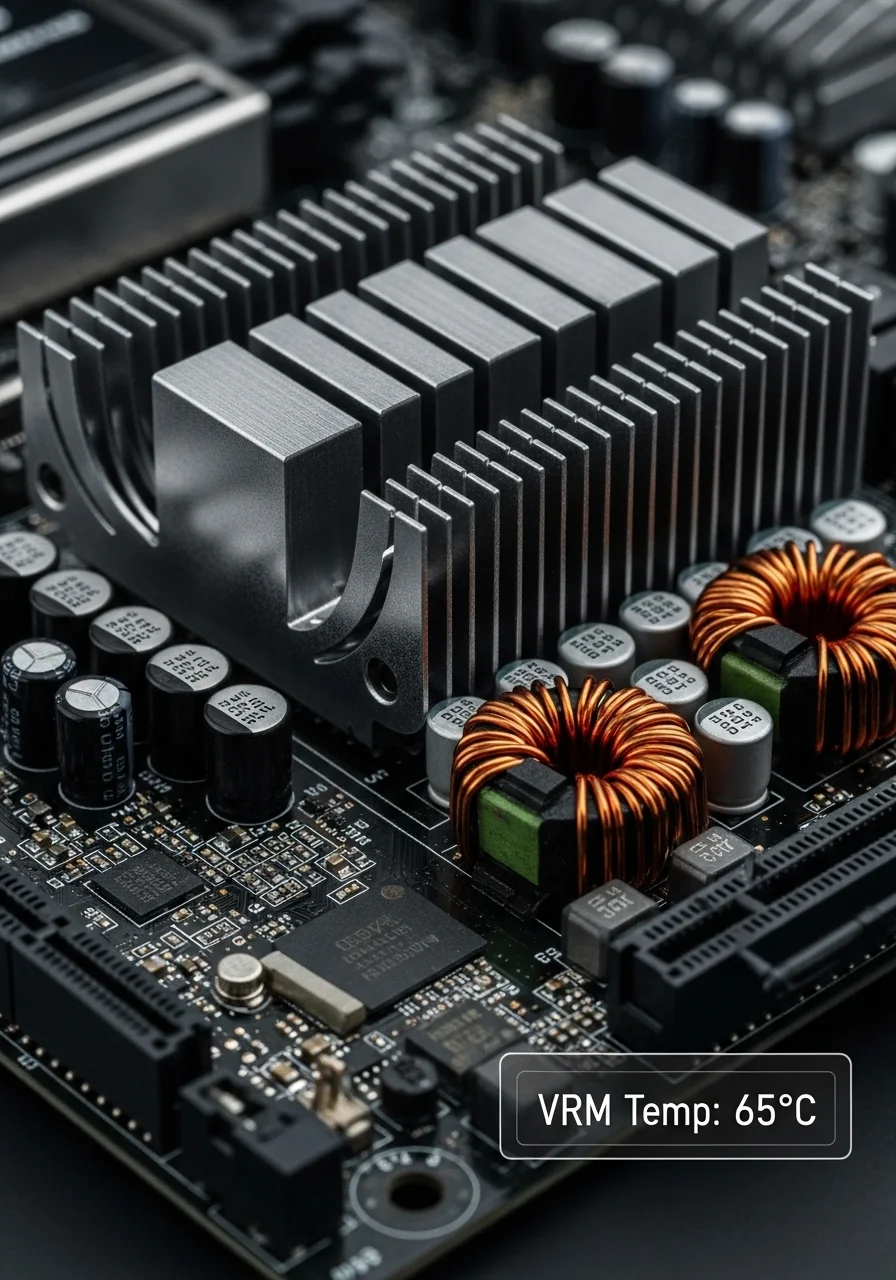
Your motherboard’s Voltage Regulator Modules, or VRMs, are critical components. They transform and stabilize power before it reaches your CPU.
Think of them as the unsung heroes managing your rig’s power. Keeping them cool is key to peak gaming performance.
What are Safe VRM Temperature Ranges?
For competitive gamers, understanding VRM temperatures is essential. These ranges dictate your system’s stability and longevity.
They also impact how hard your CPU can boost. Overheating VRMs can lead to significant performance drops.
Typical Operating Temperatures
During daily use and moderate gaming, your VRMs should ideally stay within a comfortable zone. This ensures reliable power delivery.
You want your VRMs to operate efficiently without undue stress.
- Idle/Light Use: 30-50°C is excellent.
- Moderate Gaming: 50-80°C is generally considered safe and normal.
Throttling Limits and Critical Zones
Pushing your system to its limits, especially with demanding games or overclocking, will raise VRM temperatures. But there’s a ceiling.
Exceeding certain thresholds forces your system to protect itself. This means throttling your CPU performance.
When VRMs get too hot, your motherboard will actively reduce power to the CPU. This prevents damage but crushes your FPS.
This thermal throttling directly impacts your in-game performance. You’ll experience stuttering and lower frame rates.
According to Lifewire, temperatures over 90°C can trigger throttling. This might reduce your CPU’s speed by 10-20%.
A bar chart showing the impact of overheating on CPU performance: Optimal Performance (100%) vs. With Throttling (>90°C) (80% of performance).
The table below outlines common VRM temperature ranges and their implications for your gaming rig.
| VRM Temperature (°C) | Status | Performance Impact |
|---|---|---|
| < 70°C | Excellent | Optimal stability, full performance. |
| 70-90°C | Acceptable | Stable for most gaming, monitor closely during stress. |
| 90-100°C | High | Risk of performance throttling, potential instability. |
| > 100°C | Critical | Severe throttling, system instability, long-term component damage risk. |
Monitoring and Mitigation for Gamers
To dominate your gaming circle, you need a stable system. Regularly monitor your VRM temperatures using software like HWMonitor or HWiNFO64.
If you’re hitting high VRM temperatures, especially in the 90°C+ range, it’s time to act. This is where your competitive edge can disappear.
Consider improving your case airflow with more or better fans. You might also upgrade your CPU cooler.
Larger, more efficient heatsinks can draw heat away from VRMs indirectly.
If your CPU is constantly hitting power limits due to heat, learning how to fix CPU power limit throttling can provide a massive boost.
Optimizing your power limits and ensuring sufficient cooling for your VRMs are crucial. Don’t let heat be the reason you lose a clutch.
Keep your VRMs cool and your system ready for battle. Check your temperatures and ensure you’re always operating in the green!
In Short
- VRMs are essential components that stabilize power to the CPU; keeping them cool is crucial for peak gaming performance.
- Optimal VRM temperatures range from 30-80°C, while exceeding 90°C can lead to performance throttling and system instability.
- Regularly monitoring VRM temperatures and ensuring adequate cooling are vital to prevent performance drops and maintain a stable gaming system.
The ‘Ghost Sensor’ Panic: Identifying False 100°C+ Readings
Don’t Fall for the ‘Ghost Sensor’ Scare
You’re deep in a competitive match, checking your system stats, and then you see it: a VRM temperature reading soaring past 100°C.
Panic sets in. Is your motherboard melting? Hold up, gamer. Before you hit the emergency shutdown, understand that these are often ‘ghost sensors’.
Your hardware might be fine. These false alarms often stem from monitoring software glitches or outdated drivers.
Specific motherboard quirks can also misreport sensor data. It’s a common issue that can trick even veteran players.
Verify Your VRM Temperatures Like a Pro
Don’t let phantom numbers mess with your head or your game. You need to confirm if those scorching VRM temperatures are actually real.
There are reliable ways to cross-check your system’s thermals and get the real story behind your motherboard’s VRMs.
Utilize Top Monitoring Software
Your first line of defense is robust monitoring software. Ditch generic tools and grab programs known for accurate hardware reporting.
- HWiNFO64: This is a powerhouse tool for detailed sensor data. It often provides more accurate readings by accessing deeper hardware registers.
- HWMonitor: A simpler, but still effective, option to quickly check core temperatures and voltages.
Compare readings from multiple sources if possible. If one software shows 100°C and another shows 75°C, you likely have a ghost.
The Careful ‘Touch Test’
For brave and cautious gamers, a physical touch test can offer a quick, albeit unscientific, reality check.
Only do this if you are comfortable and your PC is off. Carefully touch the heatsinks near the CPU socket after a gaming session.
If they are scorching hot to the touch, your VRMs might actually be running high. If they are merely warm, that 100°C reading is almost certainly a phantom.
Understanding VRM Temperature Ranges
To really dominate your system’s health, know what acceptable VRM temperatures look like. This helps you identify genuine problems versus software glitches.
Here’s a breakdown of common VRM temperature ranges you might see during intense gaming sessions:
A bar chart showing typical VRM temperature ranges under gaming load: Optimal (below 70°C), Normal Gaming Load (70-85°C), High/Concerning (85-95°C), and Critical/Risk (above 95°C).
Keeping an eye on these ranges helps you maintain peak performance and avoid any system instability.
What if Your VRMs Are Actually Running Hot?
If you’ve verified your temperatures and they are genuinely high, it’s time for action.
High VRM temperatures can lead to CPU throttling and stuttering, ruining your gameplay experience. This severely impacts your in-game performance.
Learning how to manage these issues is key to maintaining your edge. You can discover more about preventing performance drops by checking our guides.
Read more on how to fix CPU power limit throttling causing stuttering now.
Boost Your Case Airflow
The easiest fix for high VRM temps is often improving airflow. Ensure your case fans are correctly oriented to create optimal intake and exhaust.
Proper fan placement funnels cool air over your motherboard’s VRMs and dissipates heat effectively.
Upgrade VRM Cooling
For power-hungry systems or aggressive overclocking, stock VRM heatsinks might not be enough. Consider aftermarket VRM cooling solutions or larger heatsinks.
Some gamers even modify their cases to direct more airflow specifically over the VRM area.
Don’t let ghost sensors or actual thermal throttling hold you back. Verify your temps, optimize your cooling, and get back to dominating your gaming circle!
In Short
- False high VRM temperature readings, often called ‘ghost sensors’, are common due to software glitches or motherboard quirks.
- Verify VRM temperatures using reliable monitoring software like HWiNFO64, comparing multiple sources, or by carefully performing a physical touch test.
- If VRM temperatures are genuinely high, improve case airflow or upgrade VRM cooling to prevent performance issues.
VRM Cooling Tier List: Expectations for Budget vs. High-End Boards
Unlocking Peak Performance: The Role of VRM Cooling
Your motherboard’s Voltage Regulator Modules, or VRMs, are critical. They deliver stable, clean power to your CPU.
In gaming, this means consistent frame rates and preventing performance drops. When VRMs get too hot, they throttle.
This reduces power to your CPU, leading to lower clock speeds and FPS hits. You can’t dominate if your system is bottlenecked by heat.
Effective VRM cooling isn’t just about longevity. It is about unleashing your CPU’s full potential.
It provides the stability needed for serious gaming sessions and successful overclocking.
Budget Board VRM Cooling: Reality Check for Gamers
Budget motherboards often feature simpler VRM cooling solutions. Expect basic heatsinks that are smaller and less complex.
They typically use fewer power phases too. These boards are fine for CPUs running at stock speeds or less demanding processors.
However, they can struggle under heavy gaming loads with high-performance CPUs. Pushing a powerful CPU on a budget board might lead to thermal throttling.
This cuts your performance mid-game. It is a trade-off many competitive gamers cannot afford.

High-End Board VRM Cooling: Dominate with Confidence
High-end motherboards are built for serious power delivery. Their VRM cooling is robust, featuring large heatsinks often connected with heat pipes.
Some even integrate active cooling or liquid cooling loops. These designs efficiently dissipate heat, keeping VRM temperatures low even under extreme loads.
This superior cooling ensures rock-solid stability for overclocking. You get every ounce of power your CPU offers, without compromise.
VRM Cooling Tier List: From Entry to Elite Performance
Choosing the right motherboard for your gaming rig is crucial. It directly impacts your system’s stability and performance, especially under pressure.
Review this tier list to understand what to expect from different motherboard cooling designs. Equip yourself to make an informed decision for your next build.
| Tier Level | Typical Cooling Solution | Recommended CPU & Gaming Scenario | Expected VRM Temp (Heavy Load) |
|---|---|---|---|
| Entry-Level | Small, basic aluminum heatsinks. Minimal power phases. | Low-to-mid range CPUs, stock speeds. Casual gaming. | 70-90°C (can spike higher) |
| Mid-Range | Larger aluminum heatsinks, possibly some finning. Improved power phases. | Mid-to-high range CPUs, light overclocking. Most gaming. | 60-80°C |
| High-End | Finned aluminum heatsinks with heat pipes. Robust power delivery. | High-end CPUs, moderate to heavy overclocking. Competitive gaming. | 50-70°C |
| Enthusiast | Massive, elaborate heatsinks with heat pipes, possibly active cooling or water block integration. Max power phases. | Top-tier CPUs, extreme overclocking. Professional esports/streaming. | 40-60°C |
Monitoring Your VRM Temperatures
Keeping an eye on your VRM temperatures is a smart move for any competitive gamer. High temperatures can degrade performance over time.
Use monitoring software like HWiNFO64 to track these temps. Aim to keep your VRMs well within the safe operating range for optimal performance and longevity.
Good case airflow also plays a massive role in keeping VRMs cool. Ensure your fans are set up for positive or negative pressure depending on your case design.
A bar chart showing typical VRM temperatures under heavy gaming load for different motherboard tiers: Entry-Level (85°C), Mid-Range (70°C), High-End (60°C), Enthusiast (50°C).
Optimize Your Entire System for Victory
VRM cooling is just one piece of the performance puzzle. Every component contributes to your overall gaming experience.
Ensure your system is performing optimally. Learn how RAM timings vs. frequency can impact your system’s speed and responsiveness.
Don’t forget the foundational elements. Understanding if chipset drivers affect gaming performance can also provide a crucial edge.
Maximize every aspect of your hardware to climb the ranks.
Head over to Joltfly now to run a Device Test and challenge your gaming circle to beat your optimized setup!
In Short
- VRM cooling is critical for stable CPU power delivery and preventing thermal throttling, which can significantly reduce gaming performance.
- Budget motherboards offer basic VRM cooling suitable for stock CPUs, whereas high-end boards feature robust solutions for sustained peak performance and serious overclocking.
- Monitoring VRM temperatures and ensuring good case airflow are essential practices for optimal system stability and longevity.
Impact of CPU Coolers: Why AIO Users Face Higher VRM Temps
The Cooling Conundrum: AIO vs. Air Coolers
You want every edge in your competitive games. That means optimizing every component, including your motherboard’s VRMs.
When it comes to CPU cooling, All-in-One (AIO) liquid coolers and traditional air coolers handle VRM temperatures very differently.
Large tower air coolers don’t just cool your CPU. Their substantial heatsinks and fans often blow air directly over the Voltage Regulator Modules (VRMs).
This incidental airflow is a huge bonus, actively cooling these critical power delivery components on your motherboard.
AIOs, however, are designed to move CPU heat away from the socket. They transfer it to a radiator and fans, typically mounted at the top or front of your case.
While effective for the CPU, this design leaves the VRMs around the CPU socket without that crucial direct airflow.
Why AIO Setups Can Spike VRM Temps
With an AIO, your motherboard’s VRMs become more reliant on your case’s general airflow.
If your case fans aren’t perfectly optimized, VRM temperatures can climb.
High VRM temperatures are a silent killer for gaming performance. They lead to thermal throttling, instability, and reduced component lifespan.
When VRMs get too hot, they can’t consistently deliver stable power to your CPU. This directly impacts your in-game experience with potential stuttering.
Intense gaming sessions and especially CPU overclocking push your VRMs hard. They demand more power and generate more heat.
This makes VRM cooling even more critical to maintain peak performance and avoid unexpected drops in frames or responsiveness.
Strategies to Protect Your VRMs with an AIO
Don’t let high VRM temps slow you down. You can still dominate with an AIO cooler if you implement smart cooling strategies.
Here are key steps to keep your motherboard’s VRMs cool and stable:
- Optimize Case Airflow: Ensure you have a balanced setup of intake and exhaust fans. Aim for positive pressure if possible.
- Add Dedicated VRM Fans: Small, directional fans can be mounted to blow directly onto your VRM heatsinks. This provides targeted cooling where an AIO can’t.
- Top-Mount Your AIO Radiator: If feasible, top-mounting your AIO as an exhaust often promotes better general case airflow around the CPU socket area.
- Check VRM Heatsink Contact: Ensure your motherboard’s VRM heatsinks have good contact with the VRM components. Thermal pads should be fresh and properly installed.
- Monitor Your Temps: Use software like HWMonitor or HWiNFO64 to keep an eye on your VRM temperatures during gaming. Know your limits.
By actively managing your VRM temperatures, you ensure your system remains stable and performs at its best.
This allows you to focus on crushing the competition.
Keep those VRMs cool and your framerates high. Go test your system’s stability and push your limits on Joltfly!
In Short
- AIO liquid coolers can lead to higher motherboard VRM temperatures because they lack the incidental airflow over VRMs that large air coolers provide.
- High VRM temperatures can cause thermal throttling, system instability, and reduce component lifespan, particularly during intense gaming or CPU overclocking.
- Strategies to mitigate high VRM temperatures with an AIO include optimizing case airflow, adding dedicated VRM fans, and monitoring temperatures.
How to Accurately Monitor VRM Sensors Using HWiNFO64
Unlock Your PC’s Secrets with HWiNFO64
To truly dominate, you need to understand every component of your rig. VRM temperatures are often overlooked but critical for gaming.
HWiNFO64 is the undisputed champion for monitoring these vital sensors. It provides granular detail, giving you the edge to diagnose issues.
Don’t just guess your VRM health. Get the precise data you need to keep your motherboard running cool and efficient, even during intense esports battles.
Getting Started with HWiNFO64: Your Monitoring Blueprint
Ready to pull back the curtain on your PC’s thermal performance? Follow these steps to set up HWiNFO64 and start monitoring your motherboard’s VRMs like a pro.
Step 1: Download and Install HWiNFO64
First, grab the latest version of HWiNFO64 from its official source. Always ensure you are downloading from a trusted site to avoid any risks.
Visit the official HWiNFO64 website and download the installer. The installation process is straightforward and quick, getting you into the action fast.
Make sure to choose the correct 64-bit version for your operating system.
Download HWiNFO64 here to get started.
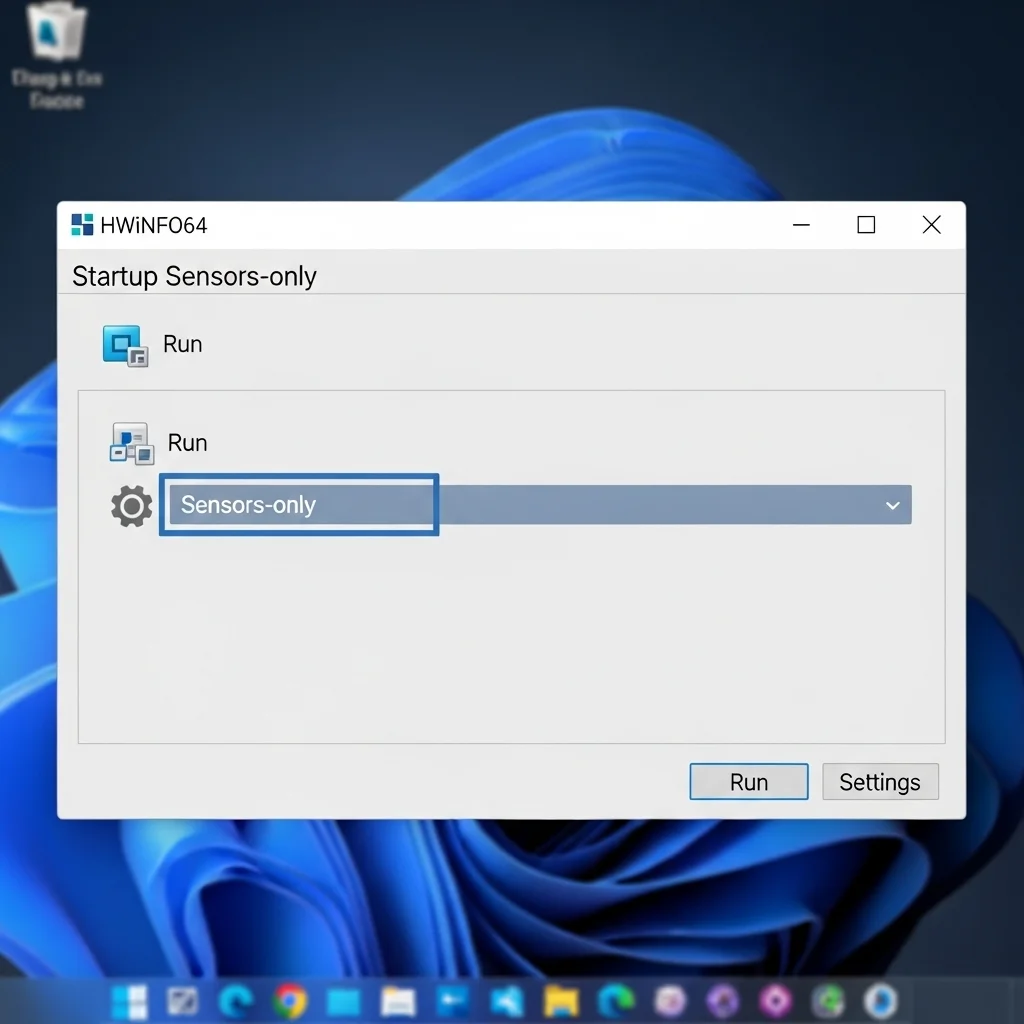
Step 2: Launch in Sensors-Only Mode
After installation, launch HWiNFO64. You’ll typically be presented with two options: “Sensors-only” or “Summary-only.”
For VRM monitoring, you absolutely want to select “Sensors-only.” This mode provides a comprehensive, real-time readout of every sensor in your system.
It’s your mission control for temperatures, voltages, fan speeds, and more. This is where you will find your critical VRM data.
Step 3: Locate Your VRM Temperature Sensors
Once HWiNFO64 opens in Sensors-only mode, you’ll see a long list of readings.
Don’t be overwhelmed.
Scroll down until you find the section for your motherboard.
Look for sensor labels like “Motherboard,” “VRM,” “MOSFET,” “CPU VRM,” “System,” or specific chipset sensor names. These are your targets.
Modern motherboards often provide multiple VRM temperature points. Focus on the highest readings under load, as these indicate potential hotspots.
Pay close attention to “Package Power” and “CPU Core Voltage (VCORE)” as these directly impact VRM workload.
Step 4: Monitor During Intense Gaming Sessions
To get accurate VRM temperature data, you need to push your system. Launch your favorite demanding game or run a CPU-intensive benchmark.
Keep HWiNFO64 running in the background. You can either alt-tab to check readings periodically or configure HWiNFO64 to log data for later analysis.
This live data reveals how your VRMs handle sustained loads. It’s crucial for understanding your system’s stability and thermal limits.
Deciphering Your VRM Temperature Readings
Knowing where to look is half the battle. Now, understand what those numbers mean for your gaming performance and hardware longevity.
Optimal VRM temperatures are key to preventing throttling and maintaining consistent frame rates. Don’t let high temps become your Achilles’ heel.
A bar chart showing typical VRM temperature ranges: Ideal (Gaming) up to 60°C, Acceptable (Gaming) up to 80°C, High (Warning) up to 90°C, and Critical (Throttle Risk) at 100°C.
Most VRMs are designed to handle temperatures up to 120℃ or even higher before outright failure. However, sustained high temperatures impact performance.
Aim to keep your VRM temperatures well below 90℃ during gaming. Anything consistently above 85℃ under load should prompt investigation.
| VRM Temperature (°C) | Status | Gaming Impact |
|---|---|---|
| Below 60 | Excellent | Optimal performance, no thermal concerns. |
| 60-80 | Good | Stable performance, typical for heavy gaming. |
| 80-90 | Watch Out | Monitor closely, potential for minor throttling. |
| Above 90 | Critical | High risk of throttling, system instability. |
Pro Tips for Optimal VRM Performance
Keeping your VRMs cool isn’t just about avoiding catastrophic failure. It’s about maximizing your hardware’s potential and winning more games.
Poor VRM cooling can lead to stuttering and instability, even if your CPU itself isn’t directly throttling.
- Enhance Case Airflow: Ensure good intake and exhaust fan setup to cycle hot air out of your case efficiently.
- Active VRM Cooling: Consider motherboards with robust VRM heatsinks or even dedicated VRM fans, especially for overclocking.
- CPU Cooler Orientation: Some tower coolers can direct airflow over the VRMs, aiding in their cooling. Check your cooler’s design.
- Under-volting: Carefully under-volting your CPU can reduce power draw and thus VRM heat, often with no performance loss.
Understanding your chipset drivers and their impact on system stability also plays a role in overall thermal management.
Monitoring VRM temps with HWiNFO64 gives you the intel. Implementing these tips gives you the advantage.
Stay vigilant, keep those VRMs cool, and your gaming rig will reward you with peak performance.
Challenge your friends to compare their VRM temps and see who truly has the most optimized setup!
In Short
- VRM temperatures are critical for stable PC performance, and HWiNFO64 is the recommended tool for granular monitoring.
- To use HWiNFO64, download it, launch in Sensors-only mode, locate motherboard VRM sensors, and monitor readings during intense gaming sessions.
- Aim to keep VRM temperatures below 900C during gaming to prevent performance throttling and ensure hardware longevity.
Stay Frosty, Game Hard
Mastering your VRM temps is the secret weapon for stable gaming. Don’t let overheating hardware rob you of those crucial frames.
Keep your rig under 80°C to ensure consistent power delivery. A cool motherboard means a long-lasting, high-performance PC.
Get in there, optimize your airflow, and push your skills to the limit.
Your hardware is ready, are you?
Frequently Asked Questions
What is the max safe VRM temp?
Most modern VRMs handle up to 100°C safely. However, we recommend staying below 80°C for optimal stability and peace of mind.
Do I need a fan on my VRM?
Usually, good case airflow is enough. If you are overclocking heavily, a dedicated spot fan can help you sustain higher clock speeds.
Why is my VRM getting so hot?
Poor airflow or dust buildup is the usual suspect. Check your case fans and clean those heatsinks to get back to winning.
Does VRM heat affect FPS?
Absolutely. If VRMs overheat, they throttle CPU power. This causes stuttering and massive FPS drops right when you need precision.