Table of Contents
Lag kills immersion. To dominate in VR, you must slash motion-to-photon latency and sync your movements perfectly.
Ready to gain a competitive edge? Let’s optimize your hardware, tweak your settings, and eliminate delay for the ultimate VR experience.
Key Takeaways
- Keep motion-to-photon latency under 20ms for a seamless, competitive VR edge.
- Optimize PC hardware and lower graphics settings to boost FPS and reduce render time.
- Use low-latency tech like NVIDIA Reflex and high refresh rate displays to minimize input lag.
- Enable Asynchronous Timewarp (ATW) to smooth out visuals and maintain immersion.
Mastering the VR Latency Budget: The 20ms Threshold
The 20ms VR Latency Budget: Your Competitive Edge
In the intense world of VR gaming, every millisecond counts. Your ultimate goal is to conquer motion-to-photon (M2P) latency.
This is the critical time between your physical movement and when that action registers visually in your headset.
Crossing the 20ms threshold can turn an immersive experience into a disorienting mess.
This isn’t just about comfort; it is about pure performance and gaining a competitive edge.
Why 20ms is Your VR Battleground
Competitive VR requires instant feedback. If your virtual world lags behind your head movements by more than 20 milliseconds, problems arise.
Your brain starts struggling to reconcile what it sees with what your body feels.
This desynchronization leads to motion sickness and a significant drop in reaction time.
To dominate, you need to reduce motion-to-photon latency in VR gaming to an absolute minimum.
Ideally, top-tier VR experiences aim for an even tighter 7ms motion-to-photon latency.
This creates a seamless, “true presence” feeling that lets you react with lightning speed.
A bar chart illustrating VR Motion-to-Photon Latency Thresholds: Acceptable Maximum Latency is 20ms, while the Ideal Latency for Immersion is 7ms, according to NVIDIA Developer documentation.
Breaking Down the Latency Chain
Motion-to-photon latency is a complex beast composed of several stages. Each stage adds precious milliseconds to the total, impacting your game.
Understanding these stages is your first step to optimization.
- Input Latency: The delay from your physical head movement or controller input to when the VR system registers it.
- Application Latency: The time your game engine takes to process your input, update the game state, and prepare the next frame for rendering.
- Render Latency: The duration required for your GPU to draw the entire virtual scene based on the application’s data.
- Asynchronous Reprojection/Timewarp: Techniques used to slightly adjust the image if a frame is late, reducing perceived latency but not eliminating it.
- Display Latency: The time it takes for the rendered image to be sent to your headset’s screen and for pixels to fully change color.
Strategies to Shatter the Latency Barrier
You can actively work to reduce motion-to-photon latency in VR gaming and hit that sub-20ms target.
Here’s how to optimize your setup and dominate the leaderboard:
- Powerful Hardware: A high-end GPU and CPU are non-negotiable for rendering complex VR scenes quickly.
- Maximize Frame Rates: Aim for the highest consistent FPS your VR headset supports. More frames mean less time between your input and visual feedback.
- Optimize Software Settings: Lower graphics settings, disable unnecessary background processes, and ensure your VR runtime is updated.
- Utilize Latency-Reducing Technologies: Features like NVIDIA Reflex or AMD Anti-Lag can significantly cut down render latency in supported titles.
- Fast Display Technology: Choose VR headsets with low-persistence displays and high refresh rates.
- Minimize Input Lag: Ensure your controllers and tracking system are performing optimally. This is part of your overall response time vs. input lag battle.
Every small optimization adds up, pushing you closer to the ideal VR experience. Don’t settle for sluggish VR.
Ready to benchmark your current setup? Visit Joltfly’s Device Tests to measure your hardware’s true performance.
Challenge your gaming circle and see who can achieve the lowest latency!
In Short
- The 20ms motion-to-photon (M2P) latency threshold is crucial for VR, with 7ms being ideal for immersive, competitive experiences.
- M2P latency is a cumulative measure of input, application, render, and display delays in a VR system.
- Optimizing VR latency involves using powerful hardware, maximizing frame rates, fine-tuning software settings, and employing fast display technology.
The Cost of Fidelity: Ray Tracing and Frame Generation Impact
The Double-Edged Sword of Visuals in VR
In competitive VR gaming, stunning visuals are great, but not at the expense of responsiveness.
Technologies like ray tracing and frame generation push graphical fidelity to new heights.
However, they introduce a critical trade-off: increased motion-to-photon latency.
This can severely impact your performance and immersion in fast-paced VR titles.
Ray Tracing: Beauty with a Performance Hit
Ray tracing delivers incredible realism by simulating light paths, creating hyper-realistic reflections, shadows, and global illumination.
While visually immersive, this process is incredibly demanding on your GPU.
Each ray-traced element adds computational load.
This increases render times and pushes up motion-to-photon latency.
In VR, even a slight increase in latency can lead to discomfort.
It also reduces your reaction time and makes tracking targets feel sluggish.
Frame Generation: Boosting FPS, Adding Latency
Frame generation techniques, like NVIDIA’s DLSS 3 Frame Generation, use AI to insert new frames.
These interpolated frames are placed between your GPU’s natively rendered frames.
This significantly boosts perceived frame rates, creating a smoother visual experience.
However, these generated frames are not “real” frames in the traditional sense.
They are predictions, and this interpolation process inherently introduces additional latency.
Your input actions are processed against an older, natively rendered frame.
You see a newer, generated frame, but the input lag is tied to the original render.
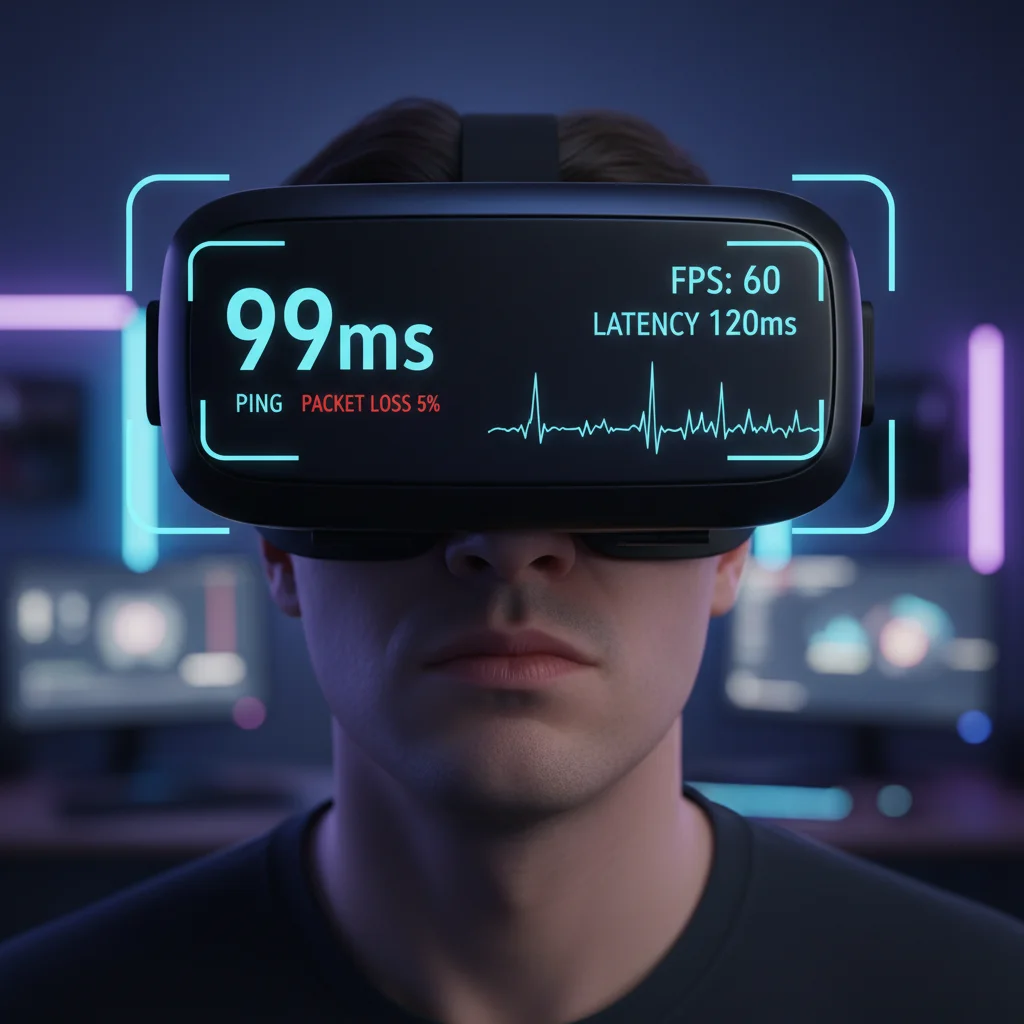
For example, a benchmark of Cyberpunk 2077 (Path Tracing, 4K) showed native rendering with 99ms latency.
With DLSS 3 Frame Generation and Reflex enabled, this dropped to 60ms.
This demonstrates how Reflex effectively counteracts frame generation’s inherent latency.
A bar chart comparing input latency: Native Rendering (99ms) vs. DLSS 3 Frame Generation + Reflex (60ms) in Cyberpunk 2077 at 4K. Data from TechPowerUp.
Striking the Balance: Fidelity vs. Responsiveness
Your goal is peak visual fidelity without sacrificing ultra-low latency.
This balance is critical for competitive VR gaming.
Here’s how to manage these powerful features:
- Prioritize VR Performance: In VR, maintaining a high, stable framerate is paramount to prevent motion sickness and ensure precise tracking.
- Selective Ray Tracing: Consider turning down or disabling ray tracing effects that don’t significantly enhance your competitive edge.
- Leverage Latency Reduction: Always enable technologies like NVIDIA Reflex or AMD Anti-Lag when available.
- These are designed to minimize system latency, even when frame generation is active. You can learn more about these competitive advantages in our NVIDIA Reflex vs AMD Anti-Lag guide.
- Test Frame Generation: Experiment with frame generation.
- While it boosts FPS, its impact on input lag can vary.
- Check if the added latency is acceptable for your playstyle.
- Our deep dive into DLSS & Input Lag offers more insights.
- Monitor Your Latency: Use in-game overlay tools or external benchmarks to monitor your real-time latency.
Don’t just chase maximum frames.
Optimize for the lowest motion-to-photon latency to dominate your VR gaming circle.
Head over to Joltfly and benchmark your current setup!
In Short
- Ray tracing and frame generation enhance VR visuals but critically increase motion-to-photon latency, negatively impacting performance and immersion.
- Frame generation boosts perceived FPS but inherently adds input lag, which can be mitigated by latency reduction technologies like NVIDIA Reflex.
- For competitive VR, it is crucial to balance visual fidelity with ultra-low latency, prioritize stable framerates, and utilize latency reduction tools.
Streamlining the Pipeline: Input, Simulation, and Rendering
Dominate VR: Understanding the Motion-to-Photon Pipeline
To crush your opponents in VR, you need to understand every millisecond of motion-to-photon latency.
This critical measurement is the total time from your real-world movement to that movement being displayed in your headset.
Reducing this delay gives you a tangible edge. It means your actions translate instantly into the game.
This boosts your reflexes and immersion. Let’s break down the core stages.
Input Latency: Your Actions, Instant Reactions
The first step in the VR pipeline is capturing your input. This includes head movements, controller actions, and even eye tracking.
Any delay here means your physical motion isn’t registered immediately by the game.
That split second can be the difference between a headshot and a whiff.
Optimizing Input Devices:
- Controller Polling Rate: Higher polling rates mean more frequent updates to your PC. Ensure your controllers are operating at their maximum rate for minimal lag.
- Tracking Quality: A robust tracking system, whether inside-out or outside-in, is crucial. Poor tracking introduces jitter and delay.
- USB Port Optimization: Connect devices to high-speed USB ports directly to your motherboard, bypassing docks when possible.
You can further minimize delays by optimizing your input devices.
Check out our guide on how to reduce controller input lag with PC overclocking for a competitive advantage.
Simulation Latency: Processing the Game World
Once your input is registered, the game engine springs into action. This “simulation” phase involves the CPU and GPU working together to update the game world.
It calculates physics, AI behavior, environmental changes, and reacts to your input. This is where your PC’s raw power truly shines.
Key Performance Boosters:
- CPU Power: A high-frequency CPU with multiple cores processes game logic faster. This reduces the time it takes for your actions to impact the virtual world.
- GPU Horsepower: The graphics card calculates the next frame. A powerful GPU can render complex scenes quickly, preventing bottlenecks.
- Efficient Code: Game developers continually optimize their engines. Always ensure your VR games are updated to the latest patches.
Even small gains in simulation efficiency add up.
Consider testing your RAM timings and frequency to ensure your system is running at peak performance.
Rendering Latency: From Data to Visuals
The rendering stage is where the magic happens. Your GPU takes the simulated game state and draws the images you see in your VR headset.
This involves complex calculations for lighting, textures, and geometry. The goal is to generate new frames as quickly as possible.
Rendering Optimization Strategies:
- High Frame Rates: Aim for the highest possible FPS your headset can display. More frames mean more up-to-date visuals.
- Graphics Settings: Lowering demanding settings like shadows, anti-aliasing, and volumetric clouds can dramatically increase frame rates.
- Resolution Scaling: Adjusting render resolution can fine-tune performance. Find the sweet spot between clarity and fluidity.
- Technologies like DLSS/FSR: These upscaling technologies can boost frame rates significantly, but consider their impact on overall latency.
The impact of rendering technologies like DLSS can be complex.
You need to know if DLSS is good for competitive gaming and how it affects input lag.
Understanding the Full Latency Breakdown
Each stage contributes to the total motion-to-photon latency. Optimizing one area can be pointless if another stage is a massive bottleneck.
The following chart illustrates a common breakdown of latency components in VR systems based on industry estimates.
A bar chart showing typical VR motion-to-photon latency breakdown: Input Tracking & Pose Estimation (3ms), Game Logic (CPU) (6ms), Rendering (GPU) (7ms), Display Pipeline (Headset) (4ms).
This breakdown shows that every millisecond counts. Targeting specific bottlenecks is how you truly gain an edge.
Actionable Steps for Lower Latency
Ready to streamline your VR experience? Follow this checklist to start reducing motion-to-photon latency today.
| Pipeline Stage | Optimization Focus | Actionable Tip |
|---|---|---|
| Input | Controller & Tracking | Ensure optimal controller tracking and battery life. Use high-speed USB ports. |
| Simulation | CPU & Game Engine | Overclock CPU safely if thermal headroom allows. Keep game and drivers updated. |
| Rendering | GPU & Graphics Settings | Adjust in-game graphics for stable high FPS. Enable performance-boosting tech like FSR. |
| Display | Headset Refresh Rate | Set your VR headset to its highest refresh rate for smoother visuals. |
Every small adjustment contributes to a more responsive, immersive, and ultimately, more competitive VR experience. Don’t leave performance on the table.
Test your system’s limits and challenge your gaming circle to see who can achieve the lowest latency.
Head over to Joltfly’s Device Tests to measure your hardware’s true performance.
Leveraging Asynchronous Timewarp (ATW) and Late Latching
Understanding Asynchronous Timewarp (ATW)
Asynchronous Timewarp, or ATW, is a critical technology for VR. It actively reduces motion-to-photon latency.
This smart technique keeps your virtual world smooth. It functions even if your PC cannot maintain a perfect framerate consistently.
Instead of waiting for a fully rendered new frame, ATW re-projects an older one. It uses your latest head position for this re-projection.
This process happens right before the frame is displayed to your eyes. It ensures timely visual updates.
ATW corrects specifically for rotational head movements. This delivers an updated image with minimal perceived delay.
The result is a VR experience that feels significantly more responsive and natural.
The Advantage of Late Latching
Late Latching works in tandem with ATW. It further minimizes perceived latency, giving you an edge.
Normally, head tracking data is captured early in the rendering pipeline. This can introduce slight delays.
By “late latching” this data, the system fetches the very freshest head tracking information.
This occurs just before the final image render, ensuring maximum accuracy.
This means the image displayed to your eyes aligns perfectly with your actual, most recent head movement.
It virtually eliminates the small delays that often cause motion sickness and a feeling of disconnect.
How ATW and Late Latching Sharpen Your VR Edge
These advanced techniques are not just for comfort. They offer a tangible competitive advantage in VR gaming.
You gain a sharper, more immediate connection to the game world. Your actions feel truly instantaneous.
Reduced motion-to-photon latency means your reactions translate instantly. Every head turn feels perfectly in sync.
Even a quick peek provides immediate visual feedback. This is crucial for competitive play.
This synchronization allows for superior situational awareness. You’ll see enemies faster and react quicker.
Here’s how ATW and Late Latching elevate your VR gameplay:
- Faster Target Acquisition: Your aim aligns with your vision precisely, cutting down on lag-induced overshoots.
- Enhanced Situational Awareness: Swift head turns show the battlefield without blur or stutter, crucial for competitive plays.
- Minimizing VR Sickness: A seamless, low-latency experience keeps you in the game longer, free from discomfort.
- Consistent Performance: Even if your GPU dips a few frames, ATW keeps rotational motion smooth and fluid.
Want to understand input lag better? Check our guide on Response Time vs Input Lag.
Mastering this knowledge gives you power in any game.
Optimize Your System for Peak VR Performance
To fully leverage ATW and Late Latching, ensure your VR headset software is always current.
Many modern VR systems automatically enable these vital optimizations. Verify your settings to be sure.
However, your overall system performance remains paramount. Aim for high FPS consistently.
Even with ATW smoothing rotational judder, a strong baseline framerate is essential.
Optimizing your PC, from CPU to GPU settings, reduces the burden on these techniques.
This ultimately provides the best possible “motion to photon” latency for your VR experience.
Consult guides for general system optimization. Keeping your frames consistently high is key.
For example, reducing other forms of input lag is crucial.
This often improves overall responsiveness across your entire gaming setup, not just VR.
Test Your VR Readiness on Joltfly
Ready to experience the true potential of low-latency VR? Apply these insights to your gaming setup.
Then, challenge your reflexes and perception right here on Joltfly.
While we don’t have a direct VR latency test, our Reaction Time Test is perfect.
It can help you gauge your raw speed and mental processing abilities.
Improve your fundamental gaming skills today. Dive back into VR.
Dominate your gaming circle with unmatched precision and speed!
Hardware Factors: High Refresh Rates and Pixel Switching Speed
Unleashing VR Visuals: The Power of High Refresh Rates
In the high-stakes world of VR gaming, every millisecond counts. High refresh rates are your first line of defense against immersion-breaking latency.
They dictate how frequently your headset displays new frames.
A higher refresh rate means smoother visuals. This reduces motion blur and makes your in-game movements feel more natural.
It is critical for competitive VR titles where precision tracking and rapid reactions are paramount.
VR headsets commonly offer refresh rates from 72Hz to 120Hz or even higher. Aim for the highest refresh rate your system can consistently maintain.
A bar chart showing typical display response times: OLED (0.03ms), TN LCD (1ms), IPS LCD (4ms), VA LCD (5ms).
Pixel Switching Speed: Eliminating Ghosting and Smear
Beyond refresh rates, pixel switching speed, also known as response time, is another vital hardware factor.
This refers to how quickly individual pixels on your VR display can change color.
Slow pixel response times lead to visual artifacts like ghosting and smearing.
Imagine seeing trails behind fast-moving objects in your VR world. It is distracting and can severely impact your performance.
For VR, you want panels with ultra-fast response times. Modern OLED panels excel here, offering near-instantaneous pixel transitions.
This is a massive advantage for motion clarity in fast-paced VR games.
To optimize further, ensure your monitor’s overdrive settings are correctly calibrated to prevent inverse ghosting.
This fine-tuning is crucial for any competitive display, including those used in VR setups.
The Synergy: How They Reduce Motion-to-Photon Latency
High refresh rates and rapid pixel switching work together. They minimize the delay between your input and what you visually perceive in the VR environment.
This collective effort slashes motion-to-photon latency.
By upgrading your VR headset or ensuring your current one is running optimally, you gain a significant competitive advantage.
You will react faster, and your aim will improve.
Comparing different panel technologies like OLED vs. TN highlights the impact on motion clarity.
These differences become even more pronounced in VR.
Don’t just take our word for it. Test your visual perception and reaction skills.
Head over to Joltfly and challenge yourself with our Reaction Time Test.
See how hardware upgrades translate into real-world performance gains. Dominate your gaming circle by perfecting your setup.
In Short
- Motion-to-photon latency is a critical measurement in VR, representing the total time from real-world movement to display in the headset.
- This latency is broken down into three core stages: Input, Simulation (game processing), and Rendering (image generation).
- Optimizing each stage, from controller polling rates and CPU/GPU power to graphics settings and frame rates, is essential for reducing overall delay and enhancing VR performance.
Dominate the Virtual World
Motion-to-photon latency is the silent killer of immersion. Don’t let lag hold you back from greatness.
Optimize your rig to shave off those milliseconds. You will react faster and feel every movement instantly.
Apply these fixes and step back into the arena. It is time to crush the competition and rule the leaderboard!
Frequently Asked Questions
What is motion-to-photon latency?
It is the time it takes for your movement to appear on the display. Keep this low to maintain total immersion.
How can I reduce VR lag?
Upgrade your GPU or lower in-game graphics settings. Always prioritize frame rate over resolution for smoother play.
What is the ideal latency target?
Aim for under 20 milliseconds. This speed keeps the virtual world stable and your reactions razor-sharp.