Table of Contents
Is a high-pitched screech ruining your immersion? GPU coil whine is a common enemy for competitive gamers trying to focus.
It distracts you from crucial audio cues and breaks your flow. But you don’t have to suffer through the annoying noise.
We will show you how to fix GPU coil whine on your gaming PC with simple software tweaks and hardware optimizations.
Key Takeaways
- Cap your FPS to match your monitor’s refresh rate to instantly reduce GPU stress and noise.
- Undervolt your GPU to lower power consumption and eliminate coil whine without losing performance.
- Adjust power limits in MSI Afterburner for a quick, effective fix that maintains stability.
- Upgrade to a high-quality PSU to minimize electrical ripple and stop the vibrations at the source.
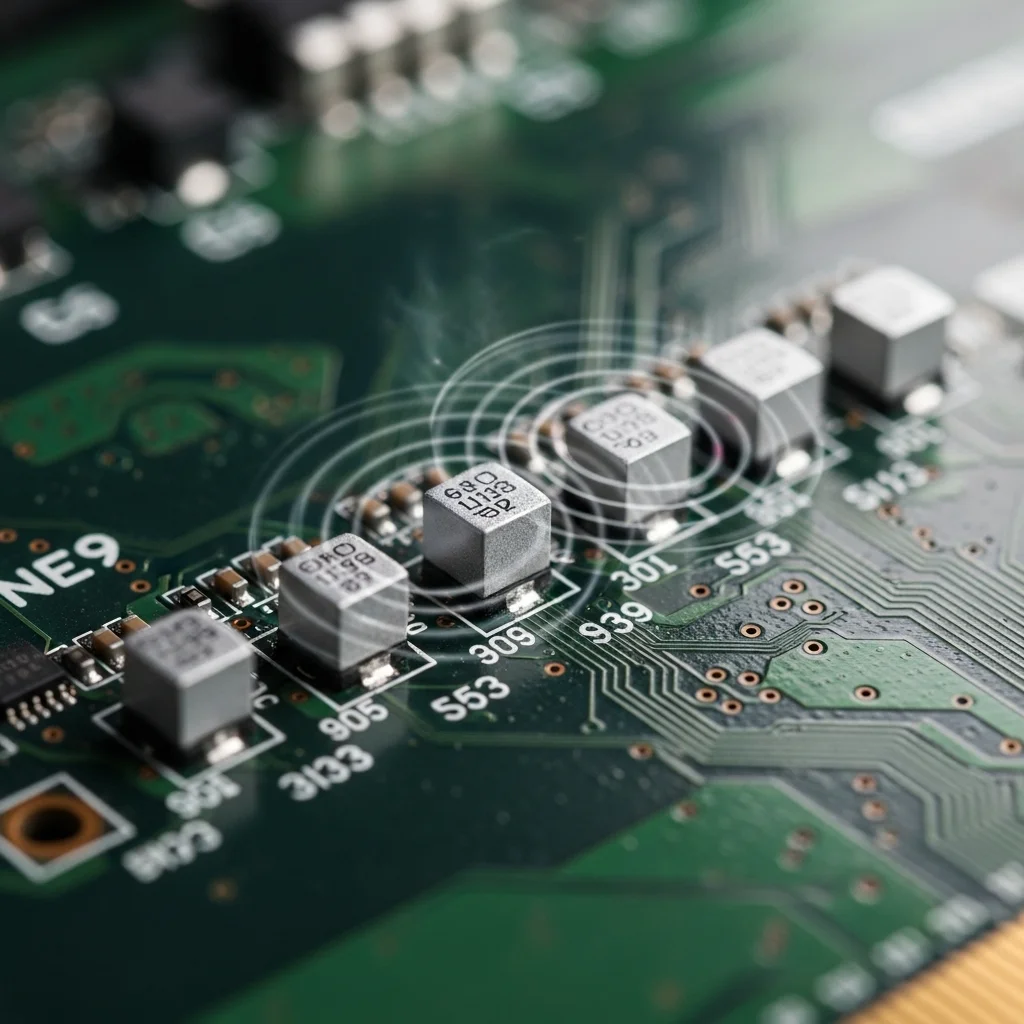
Understanding GPU Coil Whine: Vibration, Acoustics, and Safety
GPU coil whine is a common issue that can plague even top-tier gaming rigs.
It presents as a high-pitched buzzing or squealing noise emanating from your graphics card.
This isn’t just annoying; it’s a physical phenomenon. The sound originates from the rapid vibration of electrical components.
It specifically involves the inductors within your GPU’s power delivery system.
As your GPU draws power, especially under heavy load like intense gaming, these inductors experience electromagnetic forces.
These forces cause them to vibrate at frequencies audible to the human ear, creating that distinctive whine.
You’ll often hear it loudest when your GPU is rendering high frame rates, in game menus, or during loading screens.
It doesn’t typically impact your gaming performance or FPS, but it definitely impacts your focus and immersion.
Is GPU Coil Whine Dangerous?
For most competitive gamers, the immediate concern is whether coil whine signals a failing component. The good news is, in almost all cases, GPU coil whine is completely harmless.
It’s an acoustic byproduct of how inductors function, not a sign of imminent failure. Your GPU is still operating as intended, just with an audible signature.
However, while not dangerous, it can be incredibly irritating. It can distract you from critical audio cues in-game or simply break your immersion.
Many gamers find that loud PC noises, including coil whine, significantly detract from their experience.
In fact, a 2020 poll by Hardware Unboxed found that 19% of enthusiasts consider coil whine a top annoyance.
A bar chart showing the most annoying PC noises: Fans too loud (31%), Pump noise (24%), Coil whine (19%), HDD noise (14%), Other/None (12%).
Understanding this phenomenon is the first step towards managing it.
You wouldn’t want mic feedback disrupting your comms, just like you don’t want coil whine disrupting your game audio.
Check out our guide on Discord Mic Settings: Silence Your Loud Mechanical Keyboard for another common noise solution.
In the next sections, we’ll dive into actionable strategies to quiet your GPU and reclaim your gaming peace.
Key Characteristics of GPU Coil Whine
- High-pitched sound: Often described as a squeal, buzz, or hum.
- Varies with load: Louder under higher GPU utilization or frame rates.
- Non-damaging: Generally doesn’t indicate a fault or reduce GPU lifespan.
- Annoying: A significant distraction for competitive gamers.
Ready to tackle other hardware nuances that impact your play? Explore Joltfly’s Device Tests to check your gear’s performance.
In Short
- GPU coil whine is a high-pitched noise caused by the rapid vibration of electrical components, specifically inductors, within the GPU’s power delivery system under load.
- It is generally harmless and does not indicate a faulty component or reduced GPU lifespan, but is an acoustic byproduct of normal inductor function.
- While not dangerous, coil whine is a significant distraction for gamers, negatively impacting focus and immersion.
Quick Software Mitigations: FPS Caps and Power Limits
GPU coil whine can be a frustrating distraction in your gaming rig. It’s that high-pitched buzzing or squealing noise that can shatter your focus.
While often a hardware characteristic, you can combat it with smart software tweaks.
Implementing FPS caps and GPU power limits are quick, effective strategies. These methods reduce the load on your graphics card, often silencing the whine.
Taming the Beast with FPS Caps
Unleash your GPU, but not to the point of excessive noise. Capping your Frames Per Second (FPS) is a top-tier software solution.
When your GPU renders frames far beyond your monitor’s refresh rate, it works harder than needed. This can trigger or amplify coil whine.
By setting an FPS cap, you prevent your GPU from over-rendering. This reduces power draw and stress, directly cutting down on that annoying whine.
Less stress on your GPU also means cooler temps and more stable performance. It’s a win-win for both your ears and your gameplay.
A bar chart showing GPU power consumption in Cyberpunk 2077 (RTX 3080): Uncapped FPS (avg 150) uses 319W, while capping to 120 FPS reduces consumption to 236W.
A TechSpot analysis showed that capping FPS can reduce GPU power draw significantly.
For instance, in Cyberpunk 2077, an RTX 3080 consumed 319W uncapped, but only 236W when capped to 120 FPS.
Here’s how to set your FPS caps:
- In-Game Settings: Many modern games offer an FPS limit option. Set it to your monitor’s refresh rate or slightly below.
- NVIDIA Control Panel: Navigate to “Manage 3D settings,” then “Max Frame Rate.” Set your desired limit globally or per game.
- AMD Adrenalin Software: Use Radeon Chill or Radeon Anti-Lag to set frame rate targets.
- Third-Party Software: Tools like RivaTuner Statistics Server (RTSS) provide highly customizable frame rate limiting.
Dialing Down with Power Limits
Reducing your GPU’s power limit can also effectively tackle coil whine.
This tells your GPU to draw less power, which directly impacts the electrical components causing the noise.
Lower power means less current flowing through inductors. This reduces the electromagnetic forces that make them vibrate and “sing.”
You might see a slight dip in peak performance. However, for many competitive games, the trade-off for silence and stability is well worth it.
It’s about finding that sweet spot. You want to reduce the whine without crippling your FPS. Experiment to find your optimal settings.
You can adjust GPU power limits using these tools:
| Software Tool | Primary Use | Notes for Coil Whine |
|---|---|---|
| MSI Afterburner | GPU Overclocking/Monitoring | Drag the “Power Limit” slider down. This is your go-to. |
| ASUS GPU Tweak II/III | ASUS GPU Control | Similar power limit controls for ASUS cards. |
| EVGA Precision X1 | EVGA GPU Control | Dedicated power target options for EVGA cards. |
| AMD Adrenalin Software | AMD GPU Control | Look for “Power Tuning” or “WattMan” settings. |
Always make small adjustments. Test after each change to gauge both the coil whine reduction and any performance impact.
For related issues, check out how to fix CPU power limit throttling for a smoother experience.
Ready to see how your system performs after these tweaks? Head over to Joltfly and run a Joltfly Aim Trainer & Mouse Accuracy Test.
Challenge your friends to beat your high score with your newly silent, optimized rig!
In Short
- GPU coil whine can be reduced by implementing software-based FPS caps, which prevent over-rendering and lower power consumption.
- Adjusting the GPU’s power limit is another effective software method to tackle coil whine by reducing the electrical current that causes components to vibrate.
- Both FPS capping and power limiting contribute to quieter operation, lower GPU temperatures, and more stable system performance.
The Ultimate Fix: Undervolting Modern GPUs (RTX 40 & RX 7000 Series)
Coil whine can be a frustrating reality for even the most powerful gaming rigs. That high-pitched buzz from your GPU can distract from crucial in-game audio.
But there’s a killer solution for modern GPUs, especially the RTX 40 and RX 7000 series: undervolting.
Undervolting reduces the voltage supplied to your GPU while maintaining or even improving performance.
This can significantly quiet down that annoying coil whine.
It also boosts efficiency, lowers temperatures, and often increases long-term stability.
This means more consistent frames and less distraction in competitive play.

Why Undervolting Works for Coil Whine
Coil whine is typically caused by electromagnetic forces acting on the inductors in your GPU’s power delivery system.
These forces cause physical vibrations. Higher voltage often translates to stronger electromagnetic forces, leading to louder whine.
By undervolting, you reduce the electrical stress on these components.
This dampens the vibrations, significantly diminishing or even eliminating the coil whine.
It’s about finding the sweet spot where your GPU performs optimally with less power input.
Benefits Beyond Silence
While fixing coil whine is a major win, undervolting offers other powerful advantages for your gaming setup.
- Lower Temperatures: Less voltage means less heat. Your GPU will run cooler, preventing thermal throttling.
- Reduced Power Consumption: Your system draws less power. This can lead to a slightly lower electricity bill and less strain on your power supply unit.
- Improved Longevity: Running cooler and with less electrical stress can extend the life of your valuable GPU.
- Enhanced Stability: A well-undervolted GPU can sometimes be more stable, especially during intense gaming sessions.
Optimizing your power delivery is key to peak performance, much like managing other system bottlenecks to prevent stuttering.
You can explore ways to fix CPU power limit throttling for a smoother experience.
How to Undervolt Your RTX 40 Series GPU
For NVIDIA’s RTX 40 series, the process involves tweaking the voltage/frequency curve.
Most gamers use tools like MSI Afterburner. Here’s a quick guide:
- Install MSI Afterburner: Download and install the latest version.
- Open Voltage/Frequency Curve Editor: Press Ctrl+F in Afterburner.
- Find Your Sweet Spot: Drag the curve to find a stable voltage (e.g., 900mV-950mV) for your desired core clock speed.
- Apply and Test: Apply the settings and rigorously test stability with demanding games or benchmarks.
- Iterate: Adjust voltage and clock speed until you find the best balance of performance and quiet operation.
Start with small adjustments. Stability is your priority. Crashing means you pushed too far.
Example Undervolt Target for RTX 4070 (Guide)
| Setting | Stock (Approx.) | Undervolt Target | Benefit |
|---|---|---|---|
| Voltage | 1.05V | 0.925V – 0.975V | ~10-15% reduction |
| Core Clock | 2500-2600MHz | 2400-2500MHz (at lower V) | Similar performance, less heat/noise |
| Power Draw | 200W | 160-180W | Significant efficiency gain |
How to Undervolt Your RX 7000 Series GPU
AMD’s Radeon RX 7000 series also benefits greatly from undervolting. The process is streamlined through AMD Software: Adrenalin Edition.
- Open Adrenalin Software: Launch the AMD Software application.
- Navigate to Performance > Tuning: Go to the Performance tab and then select “Tuning”.
- Enable Manual Tuning: Set Tuning Control to “Manual” and enable “GPU Tuning”.
- Adjust Voltage: Locate the “Voltage” slider and incrementally reduce it (e.g., -50mV to -150mV).
- Adjust Max Frequency: You can also set a slight offset for Max Frequency, or keep it near stock.
- Test Thoroughly: Save your profile and test extensively in games and benchmarks to ensure stability.
Finding the optimal undervolt requires patience and testing. Every GPU is slightly different, even within the same model.
Performance Gains from Undervolting
Undervolting is not just about reducing coil whine.
It can unlock more consistent performance.
Tests often show a noticeable drop in power draw with minimal performance loss.
For instance, an undervolted RTX 4090 might see its total board power (TBP) drop from 450W to 350-380W.
It maintains 95-98% of stock performance. This means cooler operation and less coil whine without sacrificing frames.
A bar chart comparing average GPU power consumption for RTX 4070 and RX 7800 XT in both stock and undervolted configurations, showing significant reductions with undervolting.
These are average values based on reviews from sites like TechPowerUp and Hardware Unboxed. Your exact results may vary.
Validate Your Undervolt: Test Your System
After undervolting, rigorous testing is non-negotiable. Play your favorite competitive games. Run benchmarks.
Look for stability, performance consistency, and of course, reduced coil whine.
Use Joltfly’s Device Tests to check overall system responsiveness. Track your FPS to ensure performance remains strong.
Don’t just fix the noise, dominate your gaming circle with a perfectly optimized, silent, and powerful rig. Get testing today on Joltfly!
Step-by-Step Voltage Curve Adjustment in MSI Afterburner
GPU coil whine can be a real headache, disrupting your focus in intense gaming sessions. But don’t despair, gamer.
You can tackle this noise head-on by fine-tuning your GPU’s voltage curve. This method allows your graphics card to run cooler and quieter.
MSI Afterburner is your go-to tool for this precision adjustment. It gives you direct control over your GPU’s performance parameters.
Before You Start
Always ensure your MSI Afterburner software is up-to-date. Close any demanding applications before making adjustments.
Also, create a restore point in Windows. This safeguards your system if any stability issues arise during the process.
You’re about to gain control over your GPU’s power delivery.
Step-by-Step Voltage Curve Adjustment
- Open MSI Afterburner: Launch the application. You’ll see the main interface with sliders for Core Clock, Memory Clock, and Voltage.
- Unlock Voltage Control: In the general settings, find and check “Unlock voltage control” and “Unlock voltage monitoring.” Apply these changes. Restart Afterburner if prompted.
- Access the Voltage/Frequency Curve Editor: Press “Ctrl+F” on your keyboard. This opens the Curve Editor window, revealing a graph with voltage on the X-axis and frequency (MHz) on the Y-axis.
- Understand the Curve: Each point on the curve represents a specific voltage at which your GPU attempts to run a certain frequency. The goal is to reduce the voltage for the frequency you desire.
- Find Your Target Frequency: Start by identifying the stable frequency your GPU typically boosts to under load. Note this frequency.
- Isolate a Point: Click and drag the desired frequency point on the curve downwards to reduce its corresponding voltage. You are aiming for a stable operating point with less power.
- Adjust Other Points: After lowering your target frequency’s voltage, select all points to the right of it. Drag these selected points down to the same voltage level. This creates a flat line.
- Apply and Test: Click the checkmark button in Afterburner to apply your new settings. Now, it’s crucial to test your system for stability.
- Run Benchmarks and Games: Launch your favorite demanding games or a reliable benchmark tool like Unigine Heaven, 3DMark, or FurMark. Monitor for crashes, artifacts, or performance drops.
- Iterate and Refine: If stable, try lowering the voltage a bit more in small increments, repeating the testing process. If unstable, increase the voltage slightly until stability is achieved.
- Save Your Profile: Once you’ve found a stable, quieter setting, save it as a profile in MSI Afterburner. You can set it to apply at system startup.
This process reduces the power drawn by your GPU. Less power often translates directly to less coil whine.
It also means lower temperatures and improved energy efficiency for your gaming rig.
For example, undervolting an NVIDIA RTX 3080 can lead to a significant power reduction.
Tests show that an undervolted RTX 3080 can draw around 280W, compared to a stock draw of 319W. This is a 12% drop in power consumption.
A bar chart showing power consumption for an RTX 3080: Stock (319W) versus Undervolted (280W).
Such reductions are key to combating coil whine.
Lower power draw often means less electrical stress on components, including those inductors causing the noise.
You’re not just fixing a noise issue. You are optimizing your GPU for peak efficiency.
After adjusting your GPU voltage, make sure your system performs optimally in every aspect.
Sometimes, even minor changes can affect overall stability, leading to performance issues.
If you encounter any Windows Game Mode stuttering or other FPS drops, you may need to fine-tune your settings further.
Precision is key to domination.
Ready to push your limits? After these adjustments, head over to Joltfly and challenge your reaction time. See how your optimized rig helps you perform!
In Short
- Undervolting modern GPUs, especially RTX 40 and RX 7000 series, effectively reduces or eliminates coil whine by lowering the voltage supplied to the GPU.
- Beyond fixing coil whine, undervolting offers significant benefits including lower operating temperatures, reduced power consumption, improved GPU longevity, and enhanced stability.
- The process involves using software like MSI Afterburner for NVIDIA or AMD Adrenalin for AMD to manually adjust the voltage/frequency curve or voltage sliders to find an optimal balance of performance and efficiency.
Hardware Root Cause: How PSU Ripple Amplifies Noise
Ever wonder why your GPU sounds like a buzzing cicada during intense gaming sessions? It is not always the GPU acting alone.
Often, the root cause lies in your Power Supply Unit, or PSU.
PSU ripple can secretly amplify that annoying coil whine, diminishing your focus and your competitive edge.
Unmasking PSU Ripple: The Hidden Instigator
PSU ripple refers to small, unwanted fluctuations in the voltage output from your power supply.
Your PSU converts AC wall power into stable DC power for your PC components.
However, this conversion is rarely perfect. Some AC remnants, or “ripple,” can sneak through.
These tiny voltage spikes and dips might seem insignificant, but they put stress on your entire system.
The Ripple Effect on Your Graphics Card
Your GPU demands pristine, stable power to deliver peak performance.
When dirty power, full of ripple, flows into your GPU, its delicate components struggle.
Inductors and capacitors on your graphics card are designed to handle clean power.
When hit with fluctuating voltage, they begin to vibrate at ultrasonic frequencies.
This physical vibration is the coil whine you hear.
A higher PSU ripple means more intense vibrations, leading to louder, more persistent whine.
A bar chart showing maximum allowed ripple/noise: +12V Rail (120mV peak-to-peak), +5V Rail (50mV peak-to-peak), +3.3V Rail (50mV peak-to-peak).
Strategic Fixes: Silence the Whine, Boost Your Game
Don’t let dirty power sabotage your gaming experience. Take control with these proactive steps:
- Upgrade Your PSU: Investing in a high-quality PSU with tighter voltage regulation and lower ripple is crucial. Look for PSUs with 80 Plus Platinum or Titanium ratings.
- Optimize Power Delivery: Ensure your PSU has dedicated cables for your GPU, avoiding daisy-chaining where possible. This provides cleaner power.
- Consider Undervolting: Slightly reducing your GPU’s voltage can sometimes lessen coil whine by reducing the power demands. This requires careful testing.
- Manage Load: While not a direct fix, reducing extreme loads on your GPU can minimize overall system stress.
By tackling PSU ripple, you’re not just fixing coil whine. You’re enhancing overall system stability.
This can lead to smoother gameplay and a more consistent frame rate, giving you an edge over opponents.
A stable system minimizes issues like stuttering, allowing you to focus on dominating your gaming circle.
For more on maximizing system stability, check out our guides.
Optimizing your hardware is key to achieving peak gaming performance.
Ready to put your system’s stability to the test? Head over to Joltfly and challenge your friends to see who has the most finely tuned rig.
In Short
- PSU ripple, or unwanted voltage fluctuations, is a primary cause of GPU coil whine and can stress PC components, impacting gaming performance.
- Dirty power from PSU ripple causes GPU components like inductors and capacitors to vibrate, resulting in audible coil whine.
- Upgrading to a high-quality PSU, optimizing power delivery, and considering undervolting are strategic fixes to reduce ripple, silence coil whine, and enhance system stability for smoother gameplay.