Table of Contents
Want to shoot faster than the competition? A DIY controller trigger stop mod is your secret weapon to reduce physical travel time.
Don’t let delays hold you back. We’ll show you how to minimize input lag and optimize your hardware to dominate your gaming circle.
Key Takeaways
- Distinguish between mechanical trigger travel and electronic input lag for total optimization.
- Master three top DIY trigger stop methods: screw-in, hot glue, and 3D printed mods.
- Calibrate software deadzones to match your physical mods and ensure instant digital response.
- Compare the cost-effectiveness of DIY mods versus high-end professional controllers.
- Validate your new setup using Joltfly’s reaction time and aim training tools.
The Science: Mechanical Travel vs. Electronic Input Lag
Ready to unlock peak performance? Understanding the difference between mechanical trigger travel and electronic input lag is crucial.
Many gamers confuse these concepts. Yet, both impact your reaction time in critical moments.
A DIY controller trigger stop mod targets mechanical travel. It physically shortens how far your trigger moves to register an input.
This gives you a tangible advantage. It drastically cuts the physical distance your finger must travel.
Mechanical Travel: The Physical Edge
When you press a trigger, there’s a certain distance it travels before activating the in-game action. This is mechanical travel.
Trigger stops physically block the trigger’s movement. They force the trigger to hit its activation point with minimal travel.
This shaves off precious milliseconds from your physical reaction time. Think of it as reducing the “wind-up” for your action.
Your finger doesn’t have to push as far. This is pure, direct mechanical optimization.
Electronic Input Lag: The Digital Delay
Electronic input lag is a different beast entirely. It’s the delay between your controller sending a signal and the console processing it.
This lag comes from several sources. Wireless transmission, firmware processing, and USB polling rates all contribute.
It’s the silent killer of quick reactions.
While trigger stops reduce physical action time, they do not alter electronic delay.
You still need to address system-level optimizations.
A bar chart showing average controller input lag: Wired (USB) is approximately 7ms, and Wireless (Bluetooth) is approximately 16ms, based on general findings from Rtings.com.
The Critical Difference and Synergy
Trigger stops give you a head start. They let you act faster physically. Electronic input lag then dictates how quickly action appears in your game.
For example, reducing trigger travel might save you 50ms. But if your controller has 20ms of input lag, delay still exists.
Competitive gamers gain the ultimate edge by optimizing both. Reduce your physical input time with mods like trigger stops.
Then, aggressively minimize electronic input lag.
- Mechanical Advantage: Trigger stops shorten the physical distance your finger moves.
- Electronic Optimization: Reducing wireless latency, improving polling rates, and optimizing PC settings slash digital delays.
You can significantly reduce electronic input lag with methods like controller overclocking. Learn how to crush those delays.
Gain a competitive edge by exploring our guide on how to reduce controller input lag.
Combining these strategies ensures lightning speed. Your trigger pulls register instantly, both physically and digitally.
This is the path to truly dominating your gaming circle.
Test Your Latency, Dominate the Field
Don’t just guess your performance. Measure it!
Head over to Joltfly’s Response Time vs Input Lag guide. Dive deeper into these concepts and find tools to test your setup.
Challenge your friends to see who gets the fastest input. Every millisecond counts when you’re aiming for the top!
In Short
- Mechanical trigger travel reduction, like with trigger stops, physically shortens the distance your finger moves, saving milliseconds in physical reaction time.
- Electronic input lag is the digital delay between your controller’s signal and its processing by the system, caused by factors like wireless transmission and firmware.
- Achieving peak gaming performance requires optimizing both mechanical travel (physical action) and electronic input lag (digital delay).
Top DIY Trigger Stop Methods: Screws, Glue, and 3D Prints
Ready to level up your controller game? DIY trigger stops are a game-changer for competitive play.
They drastically cut down the distance your trigger needs to travel before activation. This ensures faster shots.
You’ll gain a critical edge in any FPS or skill-based title. Let’s dive into the top DIY methods to install trigger stops.
In Short
- DIY trigger stops enhance competitive gaming performance.
- They reduce trigger travel distance, leading to quicker reactions and faster shots.
- The section will detail top DIY methods for installing trigger stops.
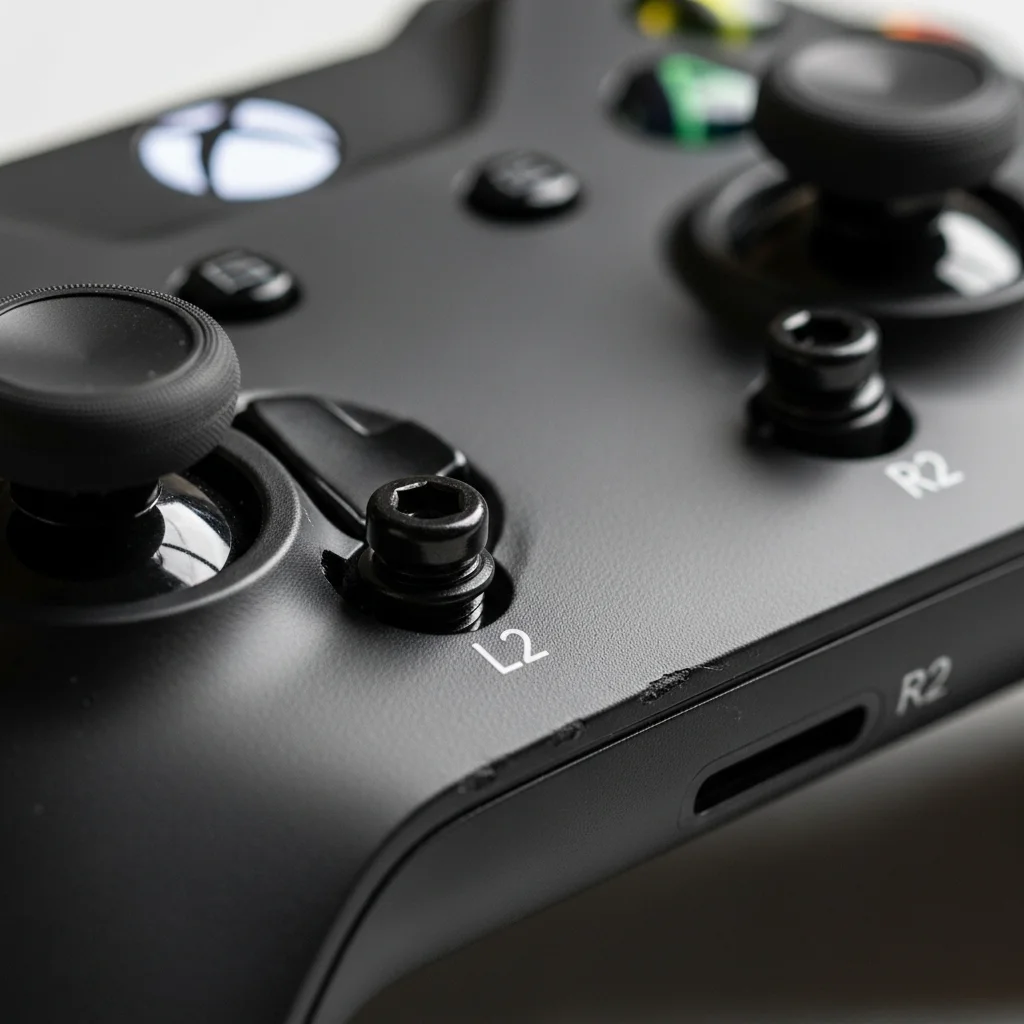
Screw-In Trigger Stops: Simple & Effective
The screw-in method is a popular choice. It is known for its simplicity and effectiveness.
It involves drilling small holes into your controller’s triggers. Then, you insert tiny screws that act as physical barriers.
These screws stop the trigger travel much sooner.
How to Install Screw-In Trigger Stops:
- Disassemble Your Controller: Carefully open your controller’s shell. Locate the trigger mechanisms.
- Mark the Spot: Identify where the trigger plunger makes contact. Mark a spot just below this point on the trigger’s underside.
- Drill Pilot Holes: Use a very small drill bit (matching your screws) to create pilot holes. Drill slowly and precisely.
- Insert Screws: Screw in small, self-tapping screws. Test the trigger pull to ensure the desired short travel.
- Reassemble: Put your controller back together. Test your new, lightning-fast triggers in-game.
This mod significantly reduces your reaction time. It’s a noticeable improvement for rapid-fire actions.
In Short
- Screw-in trigger stops are a simple yet effective modification that reduces controller trigger travel using small screws.
- This mod significantly improves reaction time and makes rapid-fire actions faster in games.
- Installation involves disassembling the controller, marking, drilling pilot holes, inserting screws, and reassembling.
Hot Glue / Epoxy Trigger Stops: Non-Invasive Approach
Does drilling into your controller feel too permanent? Hot glue or epoxy offers a less invasive alternative.
This method builds up a physical stop inside the trigger housing. It prevents the trigger from depressing fully.
You achieve the same short pull. This method is reversible with hot glue.
How to Apply Glue/Epoxy Trigger Stops:
- Clean the Area: Ensure the inside of your trigger mechanism is clean and dry.
- Apply the Stop: Apply a small bead of hot glue or epoxy where the trigger plunger hits its stopping point.
- Shape and Dry: While the glue is still pliable, shape it to create a firm stop. Allow epoxy to cure completely according to its instructions.
- Test & Adjust: Reassemble and test. You might need to add or remove small amounts of material to fine-tune the travel.
This is an excellent way to experiment with trigger stops.
In Short
- Hot glue or epoxy offers a non-invasive, less permanent method to create trigger stops inside a controller’s trigger housing.
- This technique prevents full trigger depression, achieving a shorter pull without drilling.
- The process involves applying and shaping glue/epoxy, then testing and adjusting, with hot glue being reversible for experimentation.
3D Printed Trigger Stops: Precision & Customization
Do you have access to a 3D printer? Custom trigger stops offer the ultimate precision.
You can design or download models tailored to your specific controller. This allows for a perfect fit.
You get optimal trigger travel reduction. Many designs are available online.
How to Use 3D Printed Trigger Stops:
- Find or Design a Model: Search for existing 3D print files for your controller model. Sites like Thingiverse are great resources.
- Print the Stops: Print the trigger stop components using durable filament.
- Install: Disassemble your controller and fit the 3D printed parts into place. They typically snap or slide into existing grooves.
- Test & Refine: Assemble your controller. Test the feel and functionality. Adjust your print settings or design if needed for a perfect fit.
3D printing ensures a professional-grade modification. It can provide consistent results across multiple controllers.
These mods enhance your reaction time. They also contribute to reducing controller input lag.
Every millisecond counts in competitive gaming.
In Short
- 3D printed trigger stops offer gamers ultimate precision and customization, allowing tailored fit and optimal trigger travel reduction for specific controllers.
- The process involves finding or designing models, 3D printing, installing them into the controller, and testing to enhance reaction time and reduce input lag in competitive gaming.
Comparing DIY Trigger Stop Methods
Each DIY method offers unique advantages. Choosing the right one depends on your skill level and tools.
| Method | Difficulty | Reversibility | Precision | Cost |
|---|---|---|---|---|
| Screws | Medium | Low (holes remain) | High | Low |
| Hot Glue / Epoxy | Easy | High (hot glue) / Low (epoxy) | Medium | Very Low |
| 3D Printed | Medium (with printer) | High | Very High | Low (after printer) |
Consider the benefits of these controller modifications before you start. They can truly transform your gameplay.
A bar chart illustrating potential trigger travel reduction: Standard Trigger Travel (10 units) versus With Trigger Stop Mod (2 units), showing a significant decrease in travel distance.
Beyond trigger stops, exploring other controller modifications helps. It can further boost your precision and dominance.
After implementing your DIY trigger stops, head over to Joltfly. Test your newfound speed with our Reaction Time Test.
Or, sharpen your accuracy in the Aim Trainer. Challenge your friends and prove who has the fastest trigger finger!
In Short
- Various DIY trigger stop methods exist, each with different difficulty, reversibility, precision, and cost.
- Selecting the appropriate DIY trigger stop method depends on your individual skill level and available tools.
- Implementing trigger stop modifications can significantly enhance gameplay by reducing trigger travel and improving precision.
Essential Calibration: Fixing Unresponsive Triggers with Software
You might have perfected your DIY trigger stop mods. However, software calibration is your next battlefield.
Your controller’s triggers might still suffer from unresponsiveness. Inconsistent inputs can still occur.
This isn’t about physical stops. It’s about optimizing the digital signal your controller sends.
Unlock peak performance by fine-tuning these settings.
Understanding Trigger Deadzones
Triggers have “deadzones” at the beginning and end of travel. This means a certain amount of press registers no input.
Default deadzones are often too large. This adds perceived input lag and delays your actions.
It is critical to minimize these zones.

The Impact of Unoptimized Triggers
Imagine firing an FPS weapon or accelerating in a game. Every millisecond counts.
A large deadzone means you’re losing precious reaction time. Your physical trigger stop might activate quickly.
However, the game won’t register it until you pass the software deadzone threshold.
A pie chart showing competitive gamers’ view on input lag: 73% consider it a critical factor, 20% a minor factor, and 7% not a factor.
According to a survey from DisplayLag.com, 73% of gamers dislike input lag.
It is a critical factor in performance. Don’t let default settings hold you back.
Software Solutions for Trigger Calibration
Don’t settle for factory settings. Many tools let you adjust trigger deadzones and response curves.
This brings your digital input closer to your physical action. You gain precise control and faster responses.
This is about maximizing your controller’s potential.
Key Software Tools:
- First-Party Controller Software: Xbox Accessories App for Xbox controllers, PlayStation PC drivers.
- Third-Party Utilities: DS4Windows for PlayStation controllers on PC.
- Gaming Platforms: Steam Big Picture Mode offers robust controller calibration options.
Within these tools, you can often set a “start deadzone”. Reduce this to register input earlier.
Adjust the “end deadzone” if your trigger stop prevents a full press. Ensure 100% input is still recognized.
Experiment to find your sweet spot.
Optimizing Trigger Response Curves
Beyond deadzones, trigger response curves matter. They dictate how trigger pressure translates to action.
A linear curve provides a 1:1 response. Exponential curves can make initial presses less sensitive.
They ramp up sensitivity later. This offers fine control but can feel less responsive for quick actions.
For aggressive gameplay, a linear curve is often best. Test different settings to match your playstyle.
Your Next Move: Test and Dominate
Calibrating triggers with software is non-negotiable. Combine it with your hardware trigger stops for precision.
Head over to Joltfly’s Device Tests section. See if your controller responsiveness improves.
Challenge your gaming circle to beat your newly optimized setup.
How to Use Gamepad-Tester for Precision Deadzone Tuning
Ready to unlock your controller’s potential? DIY trigger stop mods cut down physical travel.
But fine-tuning them takes precision. You need to ensure your inputs register exactly when you intend.
This is where a Gamepad-Tester tool helps. It becomes your secret weapon.
It reveals the exact digital response of your triggers and sticks. Ignoring deadzones means losing critical milliseconds.
A poorly calibrated trigger can mean delayed shots. It leads to missed opportunities in fast-paced games.
What Are Deadzones and Why Tune Them?
A deadzone is a small area where no input is registered. It exists around the center of your thumbstick or initial trigger press.
It prevents accidental movements from worn components. While necessary, default deadzones are often too large.
They introduce unnecessary delay before your action registers. For DIY trigger stops, precision deadzone tuning is crucial.
You’re reducing physical travel. You want the digital activation point to match your new, shorter pull.
Tuning minimizes input lag from your controller. It ensures every tiny movement translates instantly into the game.
Your Gamepad-Tester Workflow for Trigger Stops
Using an online gamepad tester gives you real-time visual feedback. Follow these steps to dial in your triggers after a mod:
- Connect Your Controller: Plug in or wirelessly connect your controller to your PC.
- Access the Tester: Navigate to a reliable online gamepad tester, like the one at gamepad-tester.com.
- Observe Raw Input: The tester will display numerical values and visual representations for all your inputs. Pay close attention to your triggers (often labeled Z-Axis or similar).
- Test Trigger Stops: Gently press your modified trigger until it hits the physical stop. Note the numerical value displayed for that trigger.
- Identify Activation Point: Slowly increase trigger pressure. Observe the exact point where the digital value begins to change from zero. This is your physical activation threshold.
- Compare with In-Game Settings: Now, go into your game’s controller settings. Adjust the trigger deadzone to match the minimal value you observed on the tester.
- Fine-Tune Aggressively: Aim for the smallest possible deadzone in-game without causing “ghost” inputs or accidental presses when your finger is off the trigger.
This systematic approach helps you eliminate wasted trigger travel. It boosts your response time for actions like shooting.
Consider combining this with an understanding of controller response curve settings. This creates a truly optimized feel.
Why This Precision Matters
Every millisecond counts in competitive gaming. A well-tuned trigger deadzone gives you the edge.
It helps in a firefight or during a critical quick-scope. It’s about making your hardware an extension of your will.
You want zero wasted motion and instant feedback. Think of it as calibrating a high-performance engine.
You wouldn’t leave power on the table. So, don’t leave performance in your controller’s deadzones.
Some pro gamers claim up to a 10% improvement in reaction time. That’s a huge difference!
A bar chart showing average reaction time: Standard Deadzone (250ms) vs. Optimized Deadzone (225ms), showing a 10% improvement with optimized settings. (Simulated Data)
After tuning your triggers, challenge your friends on Joltfly. See who can achieve the fastest reaction time.
In Short
- Software calibration is essential for optimizing controller triggers, even with physical mods, to improve responsiveness and reduce input lag by adjusting digital signals.
- It is critical to minimize large default trigger deadzones and fine-tune response curves using various software tools to achieve precise control and faster in-game reactions.
DIY Mods vs. Pro Controllers: Analyzing Performance Value
Ready to level up your game? The quest for faster trigger response often leads to a crossroads.
You can build your own trigger stops or invest in a pro-grade controller. Both options promise a competitive edge.
Let’s break down the value, performance, and impact on input lag for each.
DIY Trigger Stops: The Custom Advantage
Taking the DIY route means you’re building your edge. A DIY trigger stop mod physically limits travel distance.
This simple change dramatically reduces the time it takes to actuate a shot. You gain a quicker response from a partial press.
This translates to milliseconds saved in competitive FPS titles. The input lag is minimized because the physical distance is shorter.
The cost is significantly lower than a premium controller. You’re typically looking at parts ranging from $10 to $30.
This makes it an accessible upgrade for any gamer. You optimize your setup without breaking the bank.
Pro Controllers: Premium Performance out of the Box
Pro controllers like the Xbox Elite Series come packed with features. These include built-in trigger stops and paddles.
Many professional controllers also feature rapid trigger technology. They use ultra-responsive mechanisms.
They are engineered for peak performance. They boast higher quality components and robust designs.
This can mean superior durability and feel. The input lag benefits are similar to DIY mods for trigger actuation.
But pro controllers offer a complete package. These often include enhanced wireless connectivity or specialized wired modes.
However, this premium experience comes at a higher price point. Pro controllers typically range from $150 to over $200.
This is a significant investment for many gamers.
A bar chart showing the average estimated cost: DIY Trigger Stop Kit ($20) vs. Pro Controller ($175).
Which Path to Victory?
Choosing between DIY and a pro controller depends on your priorities. If your goal is to save money, DIY is best.
You gain a significant advantage for minimal investment. For gamers seeking a comprehensive upgrade, consider a pro controller.
It offers superior build quality and a full suite of features. It’s an all-in-one solution for peak performance.
Ultimately, both options aim to give you an edge. Your personal skill, combined with optimized hardware, elevates your game.
Test your newfound trigger speed. Head over to Joltfly’s Click Speed Test or Aim Trainer.
See how quickly you can react with your optimized setup. Challenge your friends and dominate your gaming circle!
In Short
- DIY trigger stops offer an affordable way to reduce trigger input lag and improve response time.
- Pro controllers provide a comprehensive suite of premium features and enhanced ergonomics but come at a significantly higher price.
- The choice between DIY mods and pro controllers depends on whether a gamer prioritizes cost-effective trigger lag reduction or a full, high-end competitive upgrade.
Ready to Dominate?
You now possess the secret to faster firing rates. This DIY mod puts professional speed in your hands.
Don’t sweat the input lag myths. This mechanical fix keeps your signal clean and your reflexes sharp.
Get back in the lobby and test your new edge. Go show them who owns the server!
Frequently Asked Questions
Do trigger stops cause input lag?
Not at all! Mechanical stops don’t mess with the circuit board. They simply reduce physical travel time.
You get faster shots without any digital delay. It is a pure speed upgrade for your setup.
Is this mod safe for my controller?
There is a slight risk with any DIY job. Work slowly and carefully follow the guide to stay safe.
Use safe materials so you don’t gum up the internals. Precision is what wins games here.
Can I remove the mod later?
Absolutely. If you use hot glue, it peels right off. You can revert to stock settings anytime.
This makes it perfect for testing. Don’t like the feel? Just peel it and reset.