Table of Contents
Tired of blurry visuals ruining your aim? Inverse ghosting distracts you from the target and kills your competitive edge in fast-paced games.
In this guide, you’ll master monitor overdrive calibration. Eliminate artifacts, sharpen motion, and dominate your gaming circle today.
Key Takeaways
- Monitor overdrive speeds up pixel transitions to reduce blur but causes inverse ghosting if pushed too far.
- VRR technology can trigger pixel overshoot at lower frame rates, requiring careful calibration for consistency.
- Use visual tools like TestUFO to identify the ‘sweet spot’ where motion blur fades without creating halos.
- Understand manufacturer terms like AMA, Trace Free, and Response Time to adjust the correct settings.
- Properly tuned overdrive enhances reaction time and tracking accuracy for a competitive gaming advantage.
Understanding Overdrive Mechanics: Ghosting vs. Pixel Overshoot
You crave lightning-fast visuals in your games. Every frame needs to be crisp, clear, and perfectly responsive. Monitor overdrive delivers just that.
But push it too far, and you’ll sabotage your visual clarity. Let’s dive into the core mechanics of overdrive.
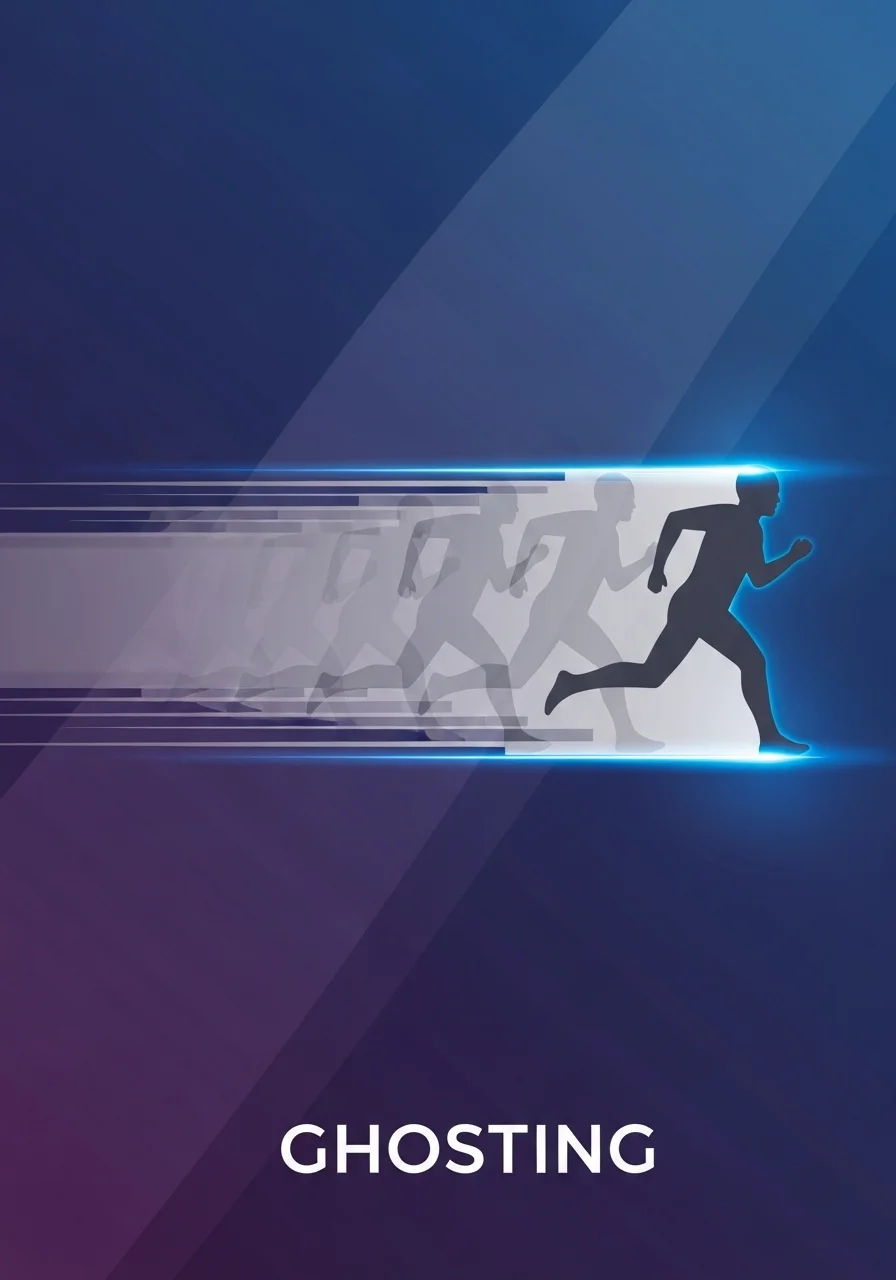
What is Ghosting?
Ghosting is your monitor’s pixels struggling to keep up with rapid changes. Imagine a blurry trail behind fast-moving objects on screen. That’s ghosting.
It happens when pixels can’t transition colors quickly enough. This delay creates a “smear” effect. In competitive FPS, this means enemies appear fuzzy.
Slow pixel response times directly impact your ability to react. You need immediate visual feedback to dominate your opponents.
The Role of Overdrive
Overdrive is a monitor feature that injects a higher voltage into the liquid crystals. This forces them to change states faster.
The goal is to reduce pixel response times. This minimizes ghosting and sharpens moving images. It’s about achieving peak motion clarity for gaming wins.
The Trap: Pixel Overshoot (Inverse Ghosting)
Here’s where it gets tricky. Too much overdrive creates a new problem: pixel overshoot. This is also known as inverse ghosting.
Instead of lagging, pixels transition too aggressively. They temporarily “overshoot” the target color before settling.
This overshoot creates visible artifacts. You’ll see bright or dark halos, outlines, or trails around moving objects. It’s a noticeable, distracting effect.
Inverse ghosting looks unnatural and can be even more disruptive than regular ghosting. It actively hinders your visual processing.
Finding the right balance is crucial. You want the fastest pixel response without these visual distortions.
Ghosting vs. Inverse Ghosting: Key Differences
Understanding the distinction helps you calibrate correctly. Both impact motion, but in different ways.
- Ghosting: A dark, blurry trail behind moving objects. Pixels are too slow.
- Inverse Ghosting: A bright or dark “halo” or artificial outline. Pixels are too fast, overshooting.
The Sweet Spot for Competitive Play
Your mission is to find the overdrive setting that eliminates ghosting without introducing overshoot. This is your monitor’s optimal performance.
Many monitors offer multiple overdrive settings: Off, Normal, Advanced, Extreme, etc. Each setting applies a different level of voltage.
Higher refresh rate monitors, like those at 240Hz or 360Hz, demand precise overdrive. Their pixels must switch incredibly fast.
For example, a study by NVIDIA found that competitive players achieve 4% higher K/D ratios on 240Hz+ monitors compared to 60Hz displays.
Optimal motion clarity, powered by calibrated overdrive, contributes significantly to this competitive edge.
A bar chart illustrating performance increases for competitive gamers using 240Hz+ monitors compared to 60Hz monitors, showing a 4% K/D ratio increase and 14% headshot increase.
This highlights why proper calibration is not just a preference. It’s a performance enhancer.
Learn more about the critical relationship between display speed and input lag by checking our guide on response time vs input lag.
Test Your Monitor’s Overdrive
Ready to dial in your settings? Joltfly provides powerful device tests to help you identify ghosting and overshoot.
Our tools empower you to visualize pixel performance. Take control of your display and eliminate visual clutter.
Challenge your gaming circle to optimize their monitors. See who can achieve the cleanest motion without inverse ghosting.
In Short
- Monitor overdrive speeds up pixel transitions to reduce ghosting and improve visual clarity.
- Too much overdrive leads to pixel overshoot, also known as inverse ghosting, which creates distracting halos or artificial outlines around moving objects.
- The optimal overdrive setting eliminates ghosting without introducing inverse ghosting, providing the best motion clarity for competitive play.
The VRR Dilemma: Why Lower Frame Rates Cause Inverse Ghosting
You’ve invested in a monitor with Variable Refresh Rate (VRR) tech like G-Sync or FreeSync. Smart move, gamer!
VRR is designed to sync your monitor’s refresh rate with your GPU’s frame rate. This eliminates screen tearing and stutter.
It promises buttery-smooth visuals, giving you a competitive edge. But there’s a catch.
Your monitor’s overdrive setting works hard to speed up pixel transitions. This reduces motion blur.
However, overdrive is often optimized for your monitor’s maximum refresh rate. Think 144Hz or 240Hz.
This fixed optimization creates a dilemma when your frame rate dips below that peak.
When you’re in a heated battle, your frame rate might fluctuate. VRR adjusts the refresh rate dynamically.
If your game drops to 60 FPS, your monitor’s refresh rate also drops to 60Hz. This is where issues arise.
The aggressive overdrive setting designed for high refresh rates becomes too much for lower frame rates.
The pixels try to transition too quickly for the slower refresh cycle. They overshoot their target color.
This “overshoot” manifests as inverse ghosting. You’ll see bright trails behind moving objects, a clear artifact.
This spoils motion clarity and can severely impact your ability to track enemies.
Inverse ghosting blurs edges and makes targets fuzzy. Every millisecond counts in competitive play.
A distorted image can lead to missed shots and lost engagements. Don’t let your gear hold you back.
This phenomenon is why calibrating your overdrive for VRR is absolutely critical.
A pie chart showing that 80% of gamers use adaptive sync (VRR) technology, while 20% do not. Source: RTINGS.com.
Over 80% of competitive gamers use adaptive sync to boost their visuals, according to RTINGS.com data.
You need to ensure your overdrive is tuned to prevent inverse ghosting across your entire VRR range.
This ensures you get maximum motion clarity, whether you’re at peak FPS or navigating a demanding scene.
Understanding this balance is key to unlocking your monitor’s full potential.
For more on perfecting your display for competitive gaming, check out our guide on DyAc vs G-Sync for ultimate motion clarity.
In Short
- Variable Refresh Rate (VRR) technology aims to eliminate screen tearing and stutter by syncing the monitor’s refresh rate with the GPU’s frame rate.
- Inverse ghosting occurs with VRR when overdrive settings, optimized for high refresh rates, are too aggressive for lower frame rates, causing pixels to overshoot their target color.
- Calibrating your monitor’s overdrive setting for the entire VRR range is critical to prevent inverse ghosting and maintain optimal motion clarity in gaming.
Step-by-Step Calibration Guide Using TestUFO
Ready to dial in your monitor’s overdrive like a pro? This guide leverages the power of TestUFO, the industry standard for motion clarity testing.
You’ll eliminate annoying visual artifacts and gain a significant edge in competitive play.
Calibrating overdrive means you get smoother motion without distracting ghosting or inverse ghosting. It’s a vital step for any serious gamer.
Prep Your Setup for Precision
Before diving into TestUFO, ensure your monitor is set up for optimal calibration. This foundational step guarantees accurate results.
First, set your monitor to its native refresh rate. For example, if you have a 144Hz display, confirm it’s running at 144Hz in your display settings.
Next, locate your monitor’s On-Screen Display (OSD) menu. You’ll need to access settings like “Overdrive,” “Response Time,” “AMA,” or “Trace Free.”
These are the controls you’ll be adjusting to find the perfect balance.
For precise calibration, temporarily disable any adaptive sync technologies like NVIDIA G-Sync or AMD FreeSync.
This ensures you’re isolating the overdrive effect properly.
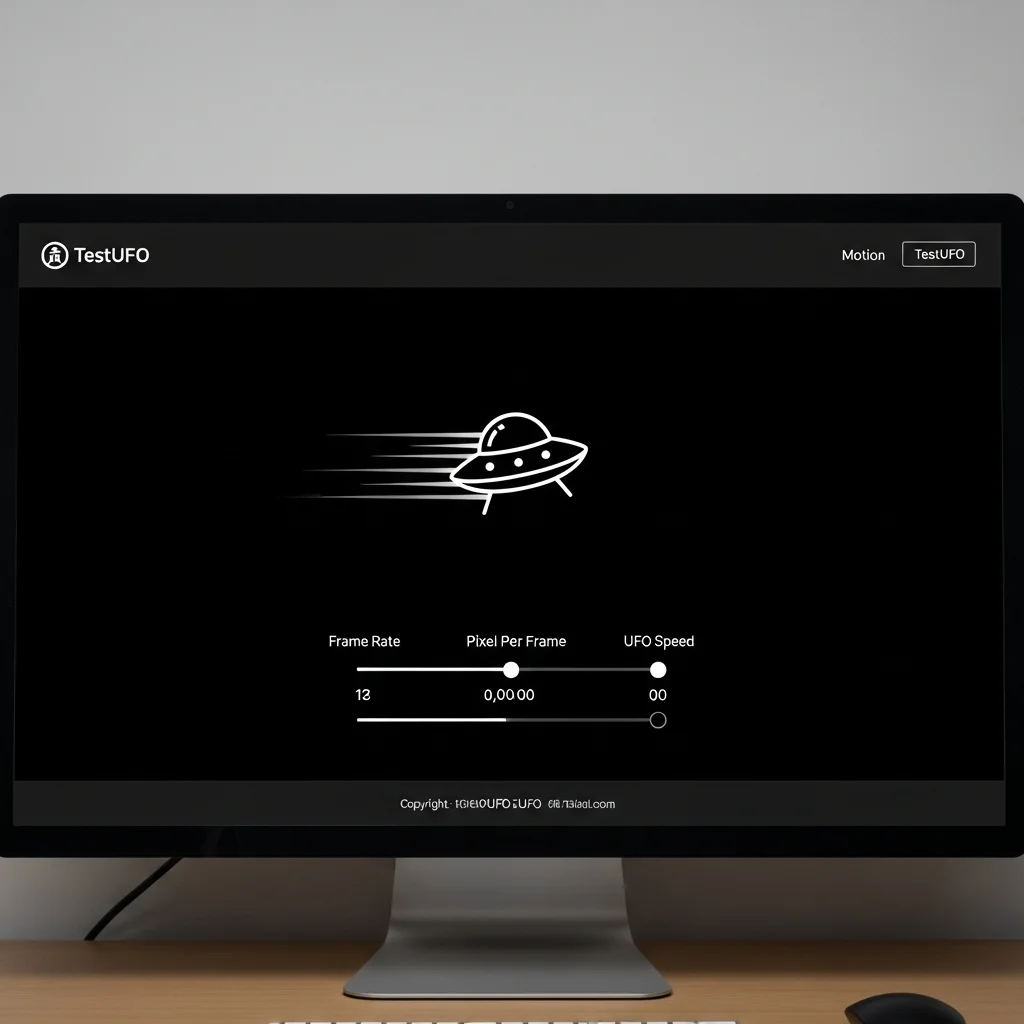
Using TestUFO: A Step-by-Step Walkthrough
Follow these steps to fine-tune your monitor’s overdrive and achieve peak motion clarity for your gaming sessions.
- Open TestUFO: Navigate to www.testufo.com in your web browser. Ensure the test is running at your monitor’s actual refresh rate.
- Observe Default Motion: Pay close attention to the moving UFOs. Note any blur or trails behind them. This is your baseline.
- Access Monitor OSD: Open your monitor’s OSD menu. Find the overdrive setting.
- Start Low: Begin with the lowest overdrive setting available, or even “Off” if possible.
- Increase Incrementally: Gradually increase the overdrive setting, one step at a time.
After each adjustment, return to TestUFO and observe the UFOs again.
You’re looking for the sweet spot between minimal ghosting and the onset of inverse ghosting.
Identifying Ghosting and Inverse Ghosting
Understanding these visual artifacts is key to successful calibration. Each has a distinct appearance.
- Ghosting: This appears as a faint, blurry trail directly behind the moving UFO. It’s like a “shadow” following the object.
- Inverse Ghosting (Overshoot): This is more severe. You’ll see bright or dark halos, outlines, or artifacts that appear ahead of the moving UFO. It’s often described as a “corona” or a “reverse shadow.” This is what you absolutely want to avoid.
Many gamers confuse optimal response time with input lag. Overdrive specifically targets response time for motion clarity.
Aim for the highest overdrive setting that minimizes ghosting without introducing any noticeable inverse ghosting.
This represents your monitor’s prime performance zone.
Every monitor is unique. The “optimal” setting will vary between models and even individual units.
| Overdrive Setting | Expected Visual Effect on TestUFO |
|---|---|
| Off / Low | Noticeable motion blur, soft trails behind UFOs. |
| Medium | Reduced blur, sharper image, faint trails might still be present. |
| High | Minimal blur, very crisp motion. Watch for subtle inverse ghosting. |
| Extreme | Clear inverse ghosting, bright or dark halos ahead of UFOs. Avoid this! |
Once you’ve found your ideal setting, lock it in. Re-enable G-Sync or FreeSync if you use it and test in your favorite games.
You’ll notice a significant improvement in overall motion clarity, allowing you to track targets and react faster.
Ready to push your limits beyond just display settings? Head over to Joltfly and challenge your skills with our advanced Advanced Click Tests.
Or, sharpen your tracking with the Aim Trainer & Mouse Accuracy Test!
Finding the Sweet Spot: Visualizing Coronas vs. Motion Blur
Ready to level up your display? Finding the sweet spot for monitor overdrive is crucial for competitive gaming.
You want pristine motion clarity, but without introducing distracting visual artifacts.
This section dives into identifying the delicate balance between annoying coronas and performance-killing motion blur.
Understanding Coronas vs. Motion Blur
Think of overdrive as your monitor’s acceleration pedal for pixel transitions. It speeds them up, making fast-moving objects appear sharper.
However, push that pedal too hard, and you get inverse ghosting, often visible as bright “coronas” or halos around moving objects.
This happens when pixels overshoot their target color.
Too little overdrive, and pixels transition too slowly. This results in traditional motion blur, where moving images appear smeared and indistinct.
Both coronas and motion blur hinder your ability to track enemies and react swiftly. Your goal is to minimize both for peak visual performance.
Visualizing the Trade-Off: The UFO Test
The best way to see these effects in action is with a dedicated test. The well-known UFO test, found on sites like TestUFO, is your go-to tool.
This test displays several moving UFO images against different backgrounds, allowing you to clearly observe motion blur and ghosting at various speeds.
Open this test in your browser. Ensure your monitor is set to its native refresh rate and adjust your in-game settings to match, if possible.
Calibrating Your Overdrive: Step-by-Step
Now, let’s dial in those settings to dominate your gaming circle:
- Start with the Lowest Overdrive Setting: Open your monitor’s OSD (On-Screen Display) menu. Find the “Overdrive,” “Response Time,” or “AMA” setting. Begin with the lowest or “Off” option.
- Observe Motion Blur: Look at the UFO test. You’ll likely see significant motion blur, making the UFOs look smudged. This is the baseline.
- Increase Overdrive Incrementally: Move up one setting at a time. After each adjustment, re-check the UFO test.
- Watch for Coronas: As you increase overdrive, you’ll notice the motion blur decreasing. Keep an eye out for bright halos appearing around the UFOs. This indicates inverse ghosting.
- Find the Sweet Spot: The ideal setting is the one where motion blur is minimized, but coronas are barely visible, or ideally, absent. It’s a delicate balance.
- Test in Game: Once you find a promising setting, jump into your favorite fast-paced game. Play for a bit. Does it feel sharp? Are there any distracting artifacts?
Every monitor is different, so what works for one might not work for yours. Take your time to really discern the subtle visual changes.
Optimizing your monitor’s response time can give you a tangible edge in competitive play. Don’t let unwanted blur or ghosting hold you back.
Want to measure your current display’s performance more precisely? Check out the Display Motion Blur Calculator on Joltfly.
Use this tool to quantify your improvements.
Then, head over to Joltfly’s Device Tests section and put your newly calibrated monitor to the ultimate challenge!
In Short
- Calibrating monitor overdrive with TestUFO is essential for achieving optimal motion clarity and eliminating visual artifacts like ghosting or inverse ghosting for competitive gaming.
- Before calibration, set your monitor to its native refresh rate, locate overdrive settings in the OSD, and temporarily disable adaptive sync technologies.
- Use TestUFO to incrementally adjust your monitor’s overdrive setting, aiming for the highest point that minimizes ghosting without introducing any noticeable inverse ghosting.
Manufacturer Glossary: Decoding Overdrive Terms (AMA, Trace Free, OD)
Ready to unlock your monitor’s true potential? Competitive gamers know every millisecond counts. That’s why understanding overdrive settings is crucial.
Manufacturers often use different names for the same core technology. Don’t let confusing terminology slow you down.
We’re breaking down the common terms you’ll encounter. Master this glossary to fine-tune your display and eliminate visual distractions.
Decoding Common Overdrive Terms
Overdrive technology is designed to speed up pixel transitions. This reduces visible ghosting and motion blur on your screen.
However, too much overdrive leads to inverse ghosting, a noticeable artifact where pixels overshoot their target color.
Here’s what different brands call their overdrive settings:
| Manufacturer | Common Overdrive Term(s) | Description |
|---|---|---|
| ASUS | Trace Free | ASUS’s pixel overdrive setting. Adjust it to reduce ghosting artifacts. |
| Acer | Over Drive / OD | Acer’s direct name for their pixel overdrive function. |
| BenQ/Zowie | AMA (Advanced Motion Accelerator) | BenQ’s proprietary overdrive tech for enhanced motion clarity. |
| Dell | Response Time | Dell monitors often use this straightforward term for overdrive. |
| LG | Response Time / Overdrive | LG uses either “Response Time” or “Overdrive” depending on the model. |
| MSI | Response Time / Overdrive | MSI also commonly labels this setting as “Response Time” or “Overdrive.” |
| Samsung | Response Time / OD | Samsung monitors often feature “Response Time” or “OD” for pixel acceleration. |
| ViewSonic | Response Time / Overdrive | ViewSonic typically uses “Response Time” or “Overdrive” in their OSD. |
Why These Settings Matter for Your Game
Each setting directly impacts how quickly your monitor’s pixels can change color. Faster transitions mean clearer motion.
But there’s a sweet spot. Pushing overdrive too high causes inverse ghosting, making fast-moving objects appear with noticeable trails or halos.
This negative artifact is also known as pixel overshoot. It can seriously hinder your visibility and reaction time in competitive titles.
Your goal is to find the setting that eliminates ghosting without introducing inverse ghosting. This delivers the sharpest image possible.
It’s all about balancing speed and image integrity to get a true competitive advantage.
Take Control of Your Display
Now that you know the lingo, you can confidently navigate your monitor’s On-Screen Display (OSD). Experiment with these settings.
Adjusting your monitor’s overdrive can drastically improve your visual experience and help you react faster.
Don’t just guess. Use tools like the Display Motion Blur Calculator on Joltfly to see the real impact of your adjustments.
Calibrate your monitor’s overdrive to perfection and dominate your gaming circle with crystal-clear motion.
In Short
- Overdrive technology speeds up pixel transitions to reduce ghosting and motion blur, with various manufacturers using different terms like AMA, Trace Free, or Response Time.
- It’s crucial to find the optimal overdrive setting to eliminate ghosting without causing inverse ghosting (pixel overshoot), which can negatively impact competitive gameplay.
- Properly adjusting overdrive settings enhances visual clarity and reaction time, providing a competitive advantage.